In this short post I cover the SharePoint Online (SPO) Launch Scheduling Tool and why you should get familiar with it before you launch a new SPO site or portal.
Getting Set To Launch Your SPO Site?
I’ve noted that my style of writing tends to build the case for the point I’m going to try to make before actually getting to the point. This time around, I’m going to lead with one of my main arguments:
Don’t do “big bang” style launches of SPO portals and sites; i.e., making your new SPO site available to all potential users as once! If you do, you may inadvertently wreck the flawless launch experience you were hoping (planning?) for.
Why "Big Bang" Is A Big Mistake
SharePoint Online (SPO) is SharePoint in the cloud. One of the benefits inherent to the majority of cloud-resident applications and services is “elasticity.” In case you’re a little hazy on how elasticity is defined and what it affords:
“The degree to which a system is able to adapt to workload changes by provisioning and de-provisioning resources in an autonomic manner, such that at each point in time the available resources match the current demand as closely as possible”
This description of elasticity helps us understand why a “big bang”-style release comes with some potential negative consequences: it goes against (rather than working with) the automatic provisioning and deprovisioning of SPO resources that serve-up the site or portal going live.
SPO is capable of reacting to an increase in user load through automated provisioning of additional SharePoint servers. This reaction and provisioning process is not instantaneous, though, and is more effective when user load increases gradually rather than all-at-once.
The Better Approach
Microsoft has gotten much better in the last bunch of years with both issuing (prescriptive) guidance and getting the word out about that guidance. And in case you might be wondering: there is guidance that covers site and portal releases.
One thing I feel compelled to mention every time I give a presentation or teach a class related to the topic at hand is this extremely useful link:
The PortalHealth link is the “entry point” for planning, building, and maintaining a healthy, high performance SPO site/portal. The page at the end of that link looks like this:
The diagram that appears below is pretty doggone old at this point (I originally saw it in a Microsoft training course for SPO troubleshooting), but I find that it still does an excellent job of graphically illustrating what a wave-based/staggered rollout looks like.
Each release wave ends up introducing new users to the site. By staggering the growing user load over time, SPO’s automated provisioning mechanisms can react and respond with additional web front-ends (WFEs) to the farm (since the provisioning process isn’t instantaneous). An ideal balance is achieved when WFE capacity can be added at a rate that keeps pace with additional users in the portal/site.
Are There More Details?
As a matter of fact, there are.
In July of this year (2021), Microsoft completed the rollout of its launch scheduling tool to all SPO environments (with a small number of exceptions). The tool not only schedules users, but it manages redirects so that future waves can’t “jump the gun” and access the new portal until the wave they’re in is officially granted access. This is an extremely useful control mechanism when you’re trying to control potential user load on the SPO environment.
The nicest part of the scheduling tool (for me) is the convenience with which it is accessed. If you go to your site’s Settings dropdown (via the gear icon), you’ll see the launch scheduler link looking you in the face:
There is some “fine print” that must be mentioned. First, the launch scheduling tool is only available for use with (modern) Communication Sites. In case any of you were still hoping (for whatever reason) to avoid going to modern SharePoint, this is yet another reminder that modern is “the way” forward …
If you take a look at a screenshot of the scheduler landing page (below), you’ll note the other “fine print” item I was going to mention:
Looking at the lower left quandrant of the image, you’ll see a health assessment report. That’s right: much like a SharePoint root site swap, you’ll need a clean bill of health from the SharePoint Page Diagnostics Tool before you can schedule your portal launch using the launch scheduling tool.
Microsoft is trying to make it increasingly clear that poorly performing sites and portals need to addressed; after all, non-performant portals/sites have the potential to impact every SPO tenant associated with the underlying farm where your tenant resides.
(2021-09-15) ADDENDUM: Scott Stewart (Senior Program Manager at Microsoft and all-around good guy) pinged me after reading this post and offered up a really useful bit of additional info. In Scott’s own words: “It may be good to also add in that waves allow the launch to be paused to fix any issues with custom code / web parts or extensions and is often what is needed when a page has customizations.”
As someone who’s been a part of a number of portal launches in the past, I can attest to the fact that portal launches seldom go off without a hitch. The ability to pause a launch to remediate or troubleshoot a problem condition is worth scheduler-controlled rollout alone!
Conclusion
The Portal Launch Scheduler is a welcome addition to the modern SharePoint Online environment, especially for larger companies and organizations with many potential SPO users. It affords control over the new site/portal launch process to control load and give the SPO environment the time it needs to note growing user load and provision additional resources. This helps to ensure that your portal/site launch will make a good (first) impression rather than the (potentially) lousy one that would be made with a “big bang” type of launch.
In this brief post, I talk about my first in-person event (SPFest Chicago) since COVID hit. I also talk about and include a recent interview with the M365 Developer Podcast.
It's Alive ... ALIVE!
I had the good fortune of presenting at SharePoint Fest Chicago 2021 at the end of July (about a month ago). I was initially a little hesitant on the drive up to Chicago since it was the first live event that I was going to do since COVID-19 knocked the world on its collective butt.
Although the good folks at SPFest required proof of vaccination or a clear COVID test prior to attending the conference, I wasn’t quite sure how the attendees and other speakers would handle standard conference activities.
Thankfully, the SPFest folks put some serious thought into the topic and had a number of systems in-place to make everyone feel as “at ease” as possible – including a clever wristband system that let folks know if you were up for close contact (like a handshake) or not. I genuinely appreciated these efforts, and they allowed me to enjoy my time at the conference without constant worries.
Good For The Soul
I’m sure I’m speaking for many (if not all) of you when I say that “COVID SUCKS!” I’ve worked from my home office for quite a few years now, so I understand the value of face-to-face human contact because it’s not something I get very often. With COVID, the little I had been getting dropped to none.
I knew that it would be wonderful to see so many of my fellow speakers/friends at the event, but I wasn’t exactly prepared for just how elated I’d be. I’m not one to normally say things like this, but it was truly “good for my soul” and something I’d been desperately missing. It truly was, and I know I’m not alone in those thoughts and that specific perception.
Although these social interactions weren’t strictly part of the conference itself, I’d wager that they were just as important to others as they were to me.
There are still a lot of people I haven’t caught up with in person yet, but I’m looking forward to remedying that in the future – provided in-person events continue. I still owe a lot of people hugs.
Speaking Of ...
In addition to presenting three sessions at the conference, I also got to speak with Paul Schaeflein and talk about SharePoint Online Performance for a podcast that he co-hosts with Jeremy Thake called the M365 Developer Podcast. Paul interviewed me at the end of the conference as things were being torn down, and we talked about SharePoint Online performance, why it mattered to developers, and a number of other topics.
I’ve embedded the podcast below:
Paul wasn’t actually speaking at the conference, but he’s a Chicagoan and he lived not-too-far from the conference venue … so he stopped down to see us and catch some interviews. It was good to catch up with him and so many others.
The interview with me begins about 13 minutes into the podcast, but I highly recommend listening to the entire podcast because Paul and Jeremy are two exceptionally knowledgeable guys with a long history with Microsoft 365 and good ol’ SharePoint.
CORRECTION (2021-09-14): in the interview, I stated that Microsoft was working to enable Public CDN for SharePoint Online (SPO) sites. Scott Stewart reached-out to me recently to correct this misstatement. Microsoft isn’t working to automatically enable Public CDN for SPO sites but rather Private CDN (which makes a lot more sense in the grand scheme of things). Thanks for the catch, Scott!
The last time I wrote about the network-attached storage (NAS) appliance that the good folks at Synology had sent my way, I spent a lot of time talking about how amazed I was at all the things that NAS appliances could do these days. They truly have come a very long way in the last decade or so.
Once I got done gushing about the DiskStation DS220+ that I had sitting next to my primary work area, I realized that I should probably do a post about it that amounted to more than a “fanboy rant.”
This is an attempt at “that post” and contains some relevant specifics on the DS220+’s capabilities as well as some summary words about my roughly five or six months of use.
First Up: Business
As the title of this post alluded to, I’ve found uses for the NAS that would be considered “work/business,” others that would be considered “play/entertainment,” and some that sit in-between. I’m going to start by outlining the way I’ve been using it in my work … or more accurately, “for non-play purposes.”
But first: one of the things I found amazing about the NAS that really isn’t a new concept is the fact that Synology maintains an application site (they call it the “Package Center“) that is available directly from within the NAS web interface itself:
Much like the application marketplaces that have become commonplace for mobile phones, or the Microsoft Store which is available by default to Windows 10 installations, the Package Center makes it drop-dead-simple to add applications and capabilities to a Synology NAS appliance. The first time I perused the contents of the Package Center, I kind of felt like a kid in a candy store.
With all the available applications, I had a hard time staying focused on the primary package I wanted to evaluate: Active Backup for Microsoft 365.
Backup and restore, as well as Disaster Recovery (DR) in general, are concepts I have some history and experience with. What I don’t have a ton of experience with is the way that companies are handling their DR and BCP (business continuity planning) for cloud-centric services themselves.
What little experience I do have generally leads me to categorize people into two different camps:
Those who rely upon their cloud service provider for DR. As a generalization, there are plenty of folks that rely upon their cloud service provider for DR and data protection. Sometimes folks in this group wholeheartedly believe, right or wrong, that their cloud service’s DR protection and support are robust. Oftentimes, though, the choice is simply made by default, without solid information, or simply because building one’s own DR plan and implementing it is not an inexpensive endeavor. Whatever the reason(s), folks in this group are attached at the hip to whatever their cloud service provider has for DR and BCP – for better or for worse.
Those who don’t trust the cloud for DR. There are numerous reasons why someone may choose to augment a cloud service provider’s DR approach with something supplemental. Maybe they simply don’t trust their provider. Perhaps the provider has a solid DR approach, but the RTO and RPO values quoted by the provider don’t line up with the customer’s specific requirements. It may also be that the customer simply doesn’t want to put all of their DR eggs in one basket and wants options they control.
In reality, I recognize that this type of down-the-middle split isn’t entirely accurate. People tend to fall somewhere along the spectrum created by both extremes.
Microsoft 365 Data Protection
On the specific topic of Microsoft 365 data protection, I tend to sit solidly in the middle of the two extremes I just described. I know that Microsoft takes steps to protect 365 data, but good luck finding a complete description or metrics around the measures they take. If I had to recover some data, I’m relatively (but not entirely) confident I could open a service ticket, make the request, and eventually get the data back in some form.
The problem with this approach is that it’s filled with assumptions and not a lot of objective data. I suspect part of the reason for this is that actual protection windows and numbers are always evolving, but I just don’t know.
You can’t throw a stick on the internet and not hit a seemingly endless supply of vendors offering to fill the hole that exists with Microsoft 365 data protection. These tools are designed to afford customers a degree of control over their data protection. And as someone who has talked about DR and BCP for many years now, redundancy of data protection is never a bad thing.
In all honesty, I wasn’t actually looking for supplemental Microsoft 365 data protection at the time. Knowing the price tag on some of the services and packages that are sold to address protection needs, I couldn’t justify (as a “home user”) the cost.
I was pleasantly surprised to learn that the Synology solution/package was “free” – or rather, if you owned one of Synology’s NAS devices, you had free access to download and use the package on your NAS.
The price was right, so I decided to install the package on my DS220+ and take it for a spin.
Kicking The Tires
First impressions and initial experiences mean a lot to me. For the brief period of time when I was a product manager, I knew that a bad first experience could shape someone’s entire view of a product.
I am therefore very happy to say that the Synology backup application was a breeze to get setup – something I initially felt might not be the case. The reason for my initial hesitancy was due to the fact that applications and products that work with Microsoft 365 need to be registered as trusted applications within the M365 tenant they’re targeting. Most of the products I’ve worked with that need to be setup in this capacity involve a fair amount manual legwork: certificate preparation, finding and granting permissions within a created app registration, etc.
Not Synology’s backup package. From the moment you press the “Create” button and indicate that you want to establish a new backup of Microsoft 365 data, you’re provided with solid guidance and hand-holding throughout the entire setup and app registration process. Of all of the apps I’ve registered in Azure, Synology’s process and approach has been the best – hands-down. It took no more than five minutes to establish a recurring backup against a tenant of mine.
I’ve included a series of screenshots (below) that walk through the backup setup process.
What Goes In, SHOULD Come Out ...
When I would regularly speak on data protection and DR topics, I had a saying that I would frequently share: “Backup is science, but Restore is an art.” A decade or more ago, those tasked with backing up server-resident data often took a “set it and forget it” approach to data backups. And when it came time to restore some piece of data from those backups, many of the folks who took such an approach would discover (to their horror) that their backups had been silently failing for weeks or months.
Motto of the story (and a 100-level lesson in DR): If you establish backups, you need to practice your restore operations until you’re convinced they will work when you need them.
Synology approaches restoration in a very straightforward fashion that works very well (at least in my use case). There is a separate web portal from which restores and exports (from backup sets) are conducted.
And in case you’re wondering: yes, this means that you can grant some or all of your organization (or your family, if you’re like me) self-service backup capabilities. Backup and restore are handled separately from one another.
As the series of screenshots below illustrates, there are five slightly different restore presentations for each of the five areas backed up by the Synology package: (OneDrive) Files, Email, SharePoint Sites, Contacts, and Calendars. Restores can be performed from any backup set and offer the ability to select the specific files/items to recover. The ability to do an in-place restore or an export (which is downloaded by the browser) is also available for all items being recovered. Pretty handy.
Will It Work For You?
I’ve got to fall-back to the SharePoint consultant’s standard answer: it depends.
I see something like this working exceptionally well for small-to-mid-sized organizations that have smaller budgets and already overburdened IT staff. Setting up automated backups is a snap, and enabling users to get their data back without a service ticket and/or IT becoming the bottleneck is a tremendous load off of support personel.
My crystal ball stops working when we’re talking about larger companies and enterprise scale. All sorts of other factors come into play with organizations in this category. A NAS, regardless of capabilities, is still “just” a NAS at the end of the day.
My DS220+ has two-2TB drives in it. I/O to the device is snappy, but I’m only one user. Enterprise-scale performance isn’t something I’m really equipped to evaluate.
Then there are the questions of identity and Active Directory implementation. I’ve got a very basic AD implementation here at my house, but larger organizations typically have alternate identity stores, enforced group policy objects (GPOs), and all sorts of other complexities that tend to produce a lot of “what if” questions.
Larger organizations are also typically interested in advanced features, like integration with existing enterprise backup systems, different backup modes (differential/incremental/etc.), deduplication, and other similar optimizations. The Synology package, while complete in terms of its general feature set, doesn’t necessarily possess all the levers, dials, and knobs an enterprise might want or need.
So, I happily stand by my “solid for small-to-mid-sized companies” outlook … and I’ll leave it there. For no additional cost, Synology’s Active Backup for Microsoft 365 is a great value in my book, and I’ve implemented it for three tenants under my control.
Rounding Things Out: Entertainment
I did mention some “play” along with the work in this post’s title – not something that everyone thinks about when envisioning a network storage appliance. Or rather, I should say that it’s not something I had considered very much.
My conversations with the Synology folks and trips through the Package Center convinced me that there were quite a few different ways to have fun with a NAS. There are two packages I installed on my NAS to enable a little fun.
Package Number One: Plex Server
Admittedly, this is one capability I knew existed prior to getting my DS220+. I’ve been an avid Plex user and advocate for quite a few years now. When I first got on the Plex train in 2013, it represented more potential than actual product.
Nowadays (after years of maturity and expanding use), Plex is a solid media server for hosting movies, music, TV, and other media. It has become our family’s digital video recorder (DVR), our Friday night movie host, and a great way to share media with friends.
I’ve hosted a Plex Server (self-hosted virtual machine) for years, and I have several friends who have done the same. At least a few of my friends are hosting from NAS devices, so I’ve always had some interest in seeing how Plex would perform on NAS device versus my VM.
As with everything else I’ve tried with my DS220+, it’s a piece of cake to actually get a Plex Server up-and-running. Install the Plex package, and the NAS largely takes care of the rest. The sever is accessible through a browser, Plex client, or directly from the NAS web console.
I’ve tested a bit, but I haven’t decommissioned the virtual machine (VM) that is my primary Plex Server – and I probably won’t. A lot of people connect to my Plex Server, and that server has had multiple transcodes going while serving up movies to multiple concurrent users – tasks that are CPU, I/O, and memory intensive. So while the NAS does a decent job in my limited testing here at the house, I don’t have data that convinces me that I’d continue to see acceptable performance with everyone accessing it at once.
One thing that’s worth mentioning: if you’re familiar with Plex, you know that they have a pretty aggressive release schedule. I’ve seen new releases drop on a weekly basis at times, so it feels like I’m always updating my Plex VM.
What about the NAS package and updates? Well, the NAS is just as easy to update. Updated packages don’t appear in the Package Center with the same frequency as the new Plex Server releases, and you won’t get the same one-click server update support (a feature that never worked for me since I run Plex Server non-interactively in a VM), but you do get a link to download a new package from the NAS’s update notification:
The “Download Now” button initiates the download of an .SPK file – a Synology/NAS package file. The package file then needs to be uploaded from within the Package Center using the “Manual Install” button:
And that’s it! As with most other NAS tasks, I would be hard-pressed to make the update process any easier.
Package Number Two: Docker
If you read the first post I wrote back in February as a result of getting the DS220+, you might recall me mentioning Docker as another of the packages I was really looking forward to taking for a spin.
The concept of containerized applications has been around for a while now, and it represents an attractive alternative to establishing application functionality without an administrator or installer needing to understand all of the ins and outs of a particular application stack, its prerequisites and dependencies, etc. All that’s needed is a container image and host.
So, to put it another way: there are literally millions of Docker container images available that you could download and get running in Docker with very little time invested on your part to make a service or application available. No knowledge of how to install, configure, or setup the application or service is required on your part.
Let's Go Digging
One container I had my eye on from the get-go was itzg’s Minecraft Server container. itzg is the online handle used by a gentleman named Geoff Bourne from Texas, and he has done all of the work of preparing a Minecraft server container that is as close to plug-and-play as containers come.
Minecraft (for those of you without children) is an immensely popular game available on many platforms and beloved by kids and parents everywhere. Minecraft has a very deep crafting system and focuses on building and construction rather than on “blowing things up” (although you can do that if you truly want to) as so many other games do.
My kids and I have played Minecraft together for years, and I’ve run various Minecraft servers in that time that friends have joined us in play. It isn’t terribly difficult to establish and expose a Minecraft server, but it does take a little time – if you do it “manually.”
I decided to take Docker for a run with itzg’s Minecraft server container, and we were up-and-running in no time. The NAS Docker package has a wonderful web-based interface, so there’s no need to drop down to a command line – something I appreciate (hey, I love my GUIs). You can easily make configuration changes (like swapping the TCP port that responds to game requests), move an existing game’s files onto/off of the NAS, and more.
I actually decided to move our active Minecraft “world” (in the form of the server data files) onto the NAS, and we ran the game from the NAS for about two months. Although we had some unexpected server stops, the NAS performed admirably with multiple players concurrently. I suspect the server stops were actually updates of some form taking place rather than a problem of some sort.
The NAS-based Docker server performed admirably for everything except Elytra flight. In all fairness, though, I haven’t been on a server of any kind yet where Elytra flight works in a way I’d describe as “well” largely because of the I/O demands associated with loading/unloading sections of the world while flying around.
Conclusion
After a number of months of running with a Synology NAS on my network, I can’t help but say again that I am seriously impressed by what it can do and how it simplifies a number of tasks.
I began the process of server consolidation years ago, and I’ve been trying to move some tasks and operations out to the cloud as it becomes feasible to do so. Where it wouldn’t have even resulted in a second thought to add another Windows server to my infrastructure, I’m now looking at things differently. Anything a NAS can do more easily (which is the majority of what I’ve tried), I see myself trying it there first.
I once had an abundance of free time on my hands. But that was 20 – 30 years ago. Nowadays, I’m in the business of simplifying and streamlining as much as I can. And I can’t think of a simpler approach for many infrastructure tasks and needs than using a NAS.
While we were answering (or more appropriately, attempting to answer) questions on this week’s webcast of the Microsoft Community Office Hours, one particular question popped-up that got me thinking and playing around a bit. The question was from David Cummings, and here was what David submitted in its entirety:
with the new teams meeting experience, not seeing Teams under Browse for PowerPoint, I’m aware that they are constantly changing the file sharing experience, it seems only way to do it is open sharepoint ,then sync to onedrive and always use upload from computer and select the location,but by this method we will have to sync for most of our users that use primarily teams at our office
Reading David’s question/request, I thought I understood the situation he was struggling with. There didn’t seem to be a way to add an arbitrary location to the list of OneDrive for Business locations and SharePoint sites that he had Office accounts signed into … and that was causing him some pain and (seemingly) unnecessary work steps.
What I’m about to present isn’t groundbreaking information, but it is something I’d forgotten about until recently (when prompted by David’s post) and was happy to still find present in some of the Office product dialogs.
Can't Get There From Here
I opened-up PowerPoint and started poking around the initial page that had options to open, save, export, etc.,for PowerPoint presentations. Selecting the Open option on the far left yielded an “Open” column like the one seen on the left.
The “Open” column provided me with the option to save/load/etc. from a OneDrive location or the any of the SharePoint sites associated with an account that had been added/attached to Office, but not an arbitrary Microsoft Teams or SharePoint site.
SharePoint and OneDrive weren’t the only locations from which files could be saved or loaded. There were also a handful of other locations types that could be integrated, and the options to add those locations appeared below the “Open” column: This PC, Add a Place, and Browse.
Selecting This PC swapped-out the column of documents to the right of the “Open” column with what I regarded as a less-functional local file system browser. Selecting Add a Place showed some potential promise, but upon further investigation I realized it was a glorified OneDrive browser:
But selecting Browse gave me what appeared to be a Windows common file dialog. As I suspected, though, there were actually some special things that could be done with the dialog that went beyond the local file system:
It was readily apparent upon opening the Browse file dialog that I could access local and mapped drives to save, load, or perform other operations with PowerPoint presentations, and this was consistent across Microsoft Office. What wasn’t immediately obvious, though, was that the file dialog had unadvertised goodies.
Dialog on Steroids
What wasn’t readily apparent from the dialog’s appearance and labels was that it had the ability to open SharePoint-resident files directly. It could also be used to browse SharePoint site structures and document libraries to find a file (or file location) I wished to work with.
Don’t believe me? Follow along as I run a scenario that highlights the SharePoint functionality in-action through a recent need of my own.
Accounts Accounts Everywhere
As someone who works with quite a few different organizations and IT shops, it probably comes as no real surprise for me to share that I have a couple dozen sets of Microsoft 365 credentials (i.e., usernames and associated passwords). I’m willing to bet that many of you are in a similar situation and wish there were a faster way to switch between accounts since it seems like everything we need to work with is protected by a different login.
Office doesn’t allow me to add every Microsoft 365 account and credential set to the “quick access” list that appears in Word, PowerPoint, Excel, etc. I have about five different accounts and associated locations that I added to my Office quick access location list. This covers me in the majority of daily circumstances, but there are times when I want to work with a Teams site or other repository that isn’t on my quick access list and/or is associated with a seldom-used credential set.
A Personal Example
Not too long ago, I had the privilege of delivering a SharePoint Online performance troubleshooting session at our recent M365 Cincinnati & Tri-State Virtual Friday event. Fellow MVP Stacy Deere-Strole and her team over at Focal Point Solutions have been organizing these sorts of events for the Cincinnati area for the last bunch of years, but the pandemic affecting everyone necessitated some changes this year. So this year, Stacy and team spun up a Microsoft Team in the Microsoft Community Teams environment to coordinate sessions and speaker activities (among other things).
Like a lot of speakers who present on Microsoft 365 topics, I have a set of credentials in the msftcommunity.com domain, and those are what I used to access the Teams team associated with M365 Cincinnati virtual event:
When I was getting my presentation ready for the event, I needed access to a couple of PowerPoint presentations that were stored in the Teams file area (aka, the associated SharePoint Online document library). These PowerPoint files contained slides about the event, the sponsors, and other important information that needed to be included with my presentation:
At the point when I located the files in the Teams environment, I could have downloaded them to my local system for reference and usage. If I did that, though, I wouldn’t have seen any late-breaking changes that might have been introduced to the slides just prior to the virtual event.
So, I decided to get a SharePoint link to each PowerPoint file through the ellipses that appeared after each file like this:
Choosing Copy Link from the context-sensitive menu popped-up another dialog that allowed me to choose either a Microsoft Teams link or a SharePoint file link. In my case, I wanted the SharePoint file link specifically:
Going back to PowerPoint, choosing Open, selecting Browse, and supplying the link I just copied from Teams …
… got me this dialog:
Well that wasn’t what I was hoping to see at the time.
I remembered the immortal words of Douglas Adams, “Don’t Panic” and reviewed the link more closely. I realized that the “can’t open” dialog was actually expected behavior, and it served to remind me that there was just a bit of cleanup I needed to do before the link could be used.
Reviewing the SharePoint link in its entirety, this is what I saw:
Breaking down this link, I had a reference to a SharePoint site’s Doc.aspx page in the site’s _LAYOUTS special folder. That was obviously not the PowerPoint presentation of interest. I actually only cared about the site portion of the link, so I modified the link by truncating everything from /_layouts to the end. That left me with:
I went back into PowerPoint with the modified site link and dropped it in the File name: textbox (it could be placed in either the File name: textbox or the path textbox at the top of the dialog; i.e., either of the two areas boxed in red below):
When I clicked the Open button after copying in the modified link, I experienced some pauses and prompts to login. When I supplied the right credentials for the login prompt(s) (in my case, my @msftcommunity.com credentials), I eventually saw the SharePoint virtual file system of the associated Microsoft Team:
The PowerPoint files of interest to me were going to be in the Documents library. When I drilled into Documents, I was aware that I would encounter a layer of folders: one folder for each Channel in the Team that had files associated with it (i.e., for each channel that has files on its Files tab). It turns out that only the Speakers channel had files, so I saw:
Drilling into the Speakers folder revealed the two PowerPoint presentations I was interested in:
And when I selected the desired file (boxed above) and clicked the Open button, I was presented with what I wanted to see in PowerPoint:
Getting Back
At this point, you might be thinking, “That seems like a lot of work to get to a PowerPoint file in SharePoint.” And honestly, I couldn’t argue with that line of reasoning.
Where this approach starts to pay dividends, though, is when we want to get back to that SharePoint document library to work with additional files – like the other PowerPoint file I didn’t open when I initially went in to the document library.
Upon closing the original PowerPoint file containing the slides I needed to integrate, PowerPoint was kind enough to place a file reference in the Presentations area/list of the Open page:
That file reference would hang around for quite some time depending on how many different files I would open over time. If I wanted the file I just worked with to hang around longer, I always had the option of pinning it to list.
But if I was done with that specific file, what do I care? Well, you may recall that there’s still another file I needed to work with in that resides in the same SharePoint location … so while the previous file reference wasn’t of any more use to me, the location where it was stored was something I had an interest in.
Fun fact: each entry in the Presentations tab has a context-sensitive menu associated with it. When I right-clicked the highlighted filename/entry, I saw:
And when I clicked the Open file location menu selection, I was taken back to the document library where both of the PowerPoint files resided:
Re-opening the SharePoint document library may necessitate re-authenticating a time or two along the way … but if I’m still within the same PowerPoint session and authenticated to the SharePoint site housing the files at the time, I won’t be prompted.
Either way, I find this “repeat experience” more streamlined than making lots of local file copies, remembering specific locations where files are stored, etc.
Conclusion
This particular post didn’t really break any new ground and may be common information to many of you. My memory isn’t what it once was, though, and I’d forgotten about the “file dialogs on steroids” when I stopped working regularly with SharePoint Designer a number of years back. I was glad to be reminded thanks to David.
If nothing else, I hope this post served as a reminder to some that there’s more than one way to solve common problems and address recurring needs. Sometimes all that is required is a bit of experimentation.
I wouldn’t be surprised if some of you might be saying and asking, “Okay, that’s an odd choice for a post – even for you. Why?”
If you’re one of those people wondering, I would say that the sentiment and question are certainly fair. I’m actually writing this as part of my agreed upon “homework” from last Monday’s broadcast of the Community Office Hours podcast (I think that’s what we’re calling them). If you’re not immediately familiar with this particular podcast and its purpose, I’ll take two seconds out to describe.
I was approached one day by Christian Buckley (so many “interesting experiences” seem to start with Christian Buckley) about a thought he had. He wanted to start doing a series of podcasts each week to address questions, concerns, problems, and other “things” related to Office 365, Microsoft Teams, and all the O365/M365 associated workloads. He wanted to open it up as a panel-style podcast, and although anyone could join, he was interested in rounding-up a handful of Microsoft MVPs to “staff” the podcast in an ongoing capacity. The idea sounded good to me, so I said “Count me in” even before he finished his thoughts and pitch.
I wasn’t sure what to expect initially … but we just finished our 22nd episode this past Monday, and we are still going strong. The cast on the podcast rotates a bit, but there are a few of us that are part of what I’d consider the “core group” of entertainers …
The podcast has actually become something I look forward to every Monday, especially with the pandemic and the general lack of in-person social contact I seem to have (or rather, don’t have). We do two sections of the podcast every Monday: one for EMEA at 11:00am EST and the other for APAC at 9:00pm EST. You can find out more about the podcast in general through the Facebook group that’s maintained. Alternatively, you can send questions and things you’d like to see us address on the podcast to OfficeHours@CollabTalk.com.
If you don’t want (or have the time) to watch the podcast live, an archive of past episodes exists on Christian’s site, I maintain an active playlist of the recorded episodes on YouTube, and I’m sure there are other repositories available.
Ok, Got It. “Your Homework,” You Say?
The broadcasts we do normally have no fixed format or agenda, so we (mostly Christian) tend to pull questions and topics to address from the Facebook group and other places. And since the topics are generally so wide-ranging, it goes without saying that we have viable answers for some topics … but there are plenty of things we’re not good at (like telephony) and freely tell you so.
Whenever we get to a question or topic that should be dealt with outside the scope of the podcast (oftentimes to do some research or contact a resource who knows the domain), we’ll avoid BSing too much … and someone will take the time to research the topic and return back the following week with what they found or put together. We’re trying to tackle a bunch of questions and topics each week, and none of us is well-versed in the entire landscape of M365. Things just change so darn fast these days ….
So, my “homework” from last week was one of these topics. And I’m trying to do one better than just report back to the podcast with an answer. The topic and research may be of interest to plenty of people – not just the person who asked about it originally. Since today is Sunday, I’m racing against the clock to put this together before tomorrow’s podcast episodes …
The Topic
Rather than trying to supply a summary of the topic, I’m simply going to share the post and then address it. The inquiry/post itself was made in the Office 365 Community Facebook group by Bilal Bajwa. Bilal is from Milwaulkee, Wisconsin, and he was seeking some PowerShell-related help:
Being the lone developer in our group of podcast regulars (and having worked a fair bit with the SharePointPnP Cmdlets for PowerShell and PowerShell in general), I offered to take Bilal’s post for homework and come back with something to share. As of today (Sunday, 8/23/2020), the post is still sitting in the Facebook group without comment – something I hope to change once this blog post goes live in a bit.
SharePointPnP Cmdlets And The Get-PnPGroup Cmdlet Specifically
If you’re a SharePoint administrator and you’re unfamiliar with the SharePoint Patterns and Practices group and the PowerShell cmdlets they maintain, I’M giving YOU a piece of homework: read the Microsoft Docs to familiarize yourself with what they offer and how they operate. They will only help make your job easier. That’s right: RTFM. Few people truly enjoy reading documentation, but it’s hard to find a better and more complete reference medium.
If you are already familiar with the PnP cmdlets … awesome! As you undoubtedly know, they add quite a bit of functionality and extend a SharePoint administrator’s range of control and options within just about any SharePoint environment. The PnP group that maintains the cmdlets (and many other tools) are a group of very bright and very giving folks.
Vesa Juvonen is one name I associate with pretty much anything PnP. He’s a Principal Program Manager at Microsoft these days, and he directs many of the PnP efforts in addition to being an exceptionally nice (and resourceful!) guy.
The SharePoint Developer Blog regularly covers PnP topics, and they regularly summarize and update PnP resource material – as well as explain it. Check out this post for additional background and detail.
Cmdlet: Get-PnPGroup
Now that I’ve said all that, let’s get started with looking at the Get-PnPGroup cmdlet that is part of the SharePointPnP PowerShell module. I will assume that you have some skill with PowerShell and have access to a (SharePoint) environment to run the cmdlets successfully. If you’re new to all this, then I would suggest reviewing the Microsoft Docs link I provide in this blog post, as they cover many different topics including how to get setup to use the SharePoint PnP cmdlets.
In his question/post, Bilal didn’t specify whether he was trying to run the Get-PnPGroup cmdlet against a SharePoint Online (SPO) site or a SharePoint on-premises farm. The operation of the SharePointPnP cmdlets, while being fairly consistent and predictable from cmdlet to cmdlet, sometimes vary a bit depending on the version of SharePoint in-use (on-premises) or whether SPO is being targeted. In my experience, the exposed APIs and development surfaces went through some enhancement after SharePoint 2013 in specific areas. One such area that was affected was data pertaining to site users and their alerts; the data is available in SharePoint 2016 and 2019 (as well as in SPO), but it’s inaccessible in 2013.
Because of this, it is best to review the online documentation for any cmdlet you’re going to use. Barring that, make sure you remember the availability of the documentation if you encounter any issues or behavior that isn’t expected.
If we do this for Get-PnPGroup, we frankly don’t get too much. The online documentation at Microsoft Docs is relatively sparse and just slightly better than auto-generated docs. But we do get a little helpful info:
We can see from the docs that this cmdlet runs against all versions of SharePoint starting with SharePoint 2013. I would therefore expect operations to be generally be consistent across versions (and location) of SharePoint.
A little further down in the documentation for Get-PnPGroup (in Example 1), we find that simply running the cmdlet is said to return all SharePoint groups in a site. Let’s see that in practice.
Running Wild
I fired up a VM-based SharePoint 2019 farm I have to serve as the target for on-prem tests. For SPO, I decided to use my family’s tenant as a test target. Due to time constraints, I didn’t get a chance to run anything against my VM environment, so I’m assuming (dangerous, I know) that on-prem results will match SPO. If they don’t, I’m sure someone will tell me below (in the Comments) …
Going against SPO involves connecting to the tenant and then executing Get-PnPGroup. The initial results:
Running Get-PnPGroup returned something, and it’s initially presented to us in a somewhat condensed table format that includes ID, (group) Title, and LoginName.
But there’s definitely more under the hood than is being shown here, and that “under the hood” part is what I suspect might have been causing Bilal some issues when he looked at his results.
We’ve all probably heard it before at some point: PowerShell is an object-oriented scripting language. This means that PowerShell manipulates and works with Microsoft .NET objects behind-the-scenes for most things. What may appear as a scalar value or simple text data on first inspection could be just the tip of the “object iceberg” when it comes to PowerShell.
Going A Bit Deeper
To learn a bit more about what the function is actually returning upon execution, I ran the Get-PnPGroup cmdlet again and assigned the function return to a variable I called $group (which you can see in the screen capture earlier). Performing this variable assignment would allow me to continue working with the function output (i.e., the SharePoint groups) without the need to keep querying my SharePoint environment.
To display the contents of $group with additional detail, the PowerShell I executed might appear a little cryptic for those who don’t live in PowerShellLand:
$group | fl
There’s some shorthand in play with that last bit of PowerShell, so I’ll spell everything out. First, fl is the shorthand notation for the Format-List cmdlet. I could have just as easily typed …
$group | Format-List
… but that’s more typing! I’m no different than anyone else, and I like to get more done with less whenpossible.
Next, the pipe (“|”) will be familiar to most PowerShell practitioners, and here it’s used to send the contents of the $group variable to the Format-List cmdlet. The Format-List cmdlet then expands the data piped to it (i.e., the SharePoint groups in $group) and shows all the property values that exist for each SharePoint group.
If you’re not familiar with .NET objects or object-oriented development, I should point out that the SharePoint groups returned and assigned to our $group variable are .NET objects. Knowing this might help your understanding – or maybe not. Try not to worry if you’re not a dev and don’t speak dev. I know that to many admins, devs might as well be speaking jive …
For our purposes today, we’re going to limit our discussion and analysis of objects to just their properties – nothing more. The focus still remains PowerShell.
What Are The Actual Properties Available To Us?
If you’re asking the question just posed, then you’re following along and hopefully making some kind of sense of a what I’m sharing.
So, what are the properties that are exposed by each of the SharePoint groups? Looking at the output of the $group variable sent to the Format-List command (shown earlier) gives you an idea, but there’s a much quicker and more reliable way to get the listing of properties.
You may not like what I’m about to say, but it probably won’t surprise you: those properties are documented (for everyone to learn about) in Microsoft Docs. Yes, another documentation reference!
How did I know what to look/search for? If you refer to the end of the reference for the Get-PnPGroup cmdlet, there is a section that describes the “Outputs” from running the cmdlet. That output is only one line of text, and it’s exactly what we need to make the next hop in our hunt for properties details:
List<Microsoft.SharePoint.Client.Group>
A List is a .NET collection class, but that’s not important for our purposes. Simply put, you can think of a .NET List as a “bucket” into which we put other objects – including our SharePoint groups. The class/type that is identified between the “<” and “>” after List specify the type of each object in the List. In our case, each item in the List is of type Microsoft.SharePoint.Client.Group.
If you search for that class type, you’ll get a reference in your search results that points to a Microsoft Docs link serving as a reference for the SharePoint Group type we’re interested in. And if we look at the “Properties” link of that particular reference, each of the properties that appear in our returned groups are spelled out with additional information – in most cases, at least basic usage information is included.
A quick look at those properties and a review of one of the groups in the $group variable (shown below) should convince you that you’re looking at the right reference.
What Do We Do Now?
You might recall that we’re going through this exercise of learning about the output from the Get-PnPGroup cmdlet because Bilal asked the question, “Any idea how to filter?”
Hopefully the output that’s returned from the cmdlet makes some amount of sense, and I’ve convinced you (and Bilal) that it’s not “garbage” but a List collection of .NET objects that are all of the Microsoft.SharePoint.Client.Group type.
At this point, we can leave our discussion of .NET objects behind (for the most part) and transition back to PowerShell proper to talk about filtering. We could do our filtering without leaving .NET, but that wouldn’t be considered the “PowerShell way” of doing it. Just remember, though: there’s almost always more than one way to get the results you need from PowerShell …
Filtering The Results
In the case of my family’s SPO tenant, there are a total of seven (7) SharePoint groups in the main site collection:
Looking at a test case for filtering, I’m going to try to get any group that has “McDonough” in its name.
A SharePoint group’s name is the value of the Title property, and a very straightforward way to filter a collection of objects (which we have identified exists within our $group variable) is through the use of the Where-Object cmdlet.
Let’s setup some PowerShell that should return only the subset of groups that I’m interested in (i.e., those with “McDonough” in the Title). Reviewing the seven groups in my site collection, I note that only three (3) of them contain my last name. So, after filtering, we should have precisely three groups listed.
… and executing this, we get back the filtered results predicted and expected; i.e., three SharePoint groups:
For those that could use a little extra clarification, I will summarize what transpired when I executed that last line of PowerShell.
From our previous Get-PnPGroup operation, we knew that the $group variable contained the seven groups that exist in my site collection.
We piped (“|”) that unfiltered collection of groups to the Where-Object cmdlet. It’s worth pointing out that the cmdlets and most of the other strings/text in PowerShell are case-insensitive (Where-Object, where-object, and WhErE-oBjEcT are all the same from a PowerShell processing perspective).
The curly braces after the where-object cmdlet define the logic that will be processed for each object (i.e., SharePoint group) that is passed to the where-object cmdlet.
Within the curly braces, we indicated that we wanted to filter and keep each group that had a Title which was like “*McDonough*” This was accomplished with the -like operator (PowerShell has many other operators, too). The asterisks before and after “McDonough” are simply wildcards that will match against anything with “McDonough” in the Title – regardless of any text or characters appearing before and/or after “McDonough”
Also worth nothing within the curly braces is the “$_.” notation. When iterating through the collection of SharePoint groups, the “$_.” denotes the current object/group we’re evaluating – each one in turn.
Round Two
Let’s try another one before pulling the plug (figuratively and literally – it’s close to my bed time …)
Let’s filter and keep only the groups where the members of the group can also edit the group membership. This is an uncommon scenario, and we might wish to know this information for some potential security tightening.
Looking at the properties available on the Group type, I see the one I’m interested in: AllowMembersEditMembership. It’s a boolean value, and I want back the groups that have a value of true (which is represented as $true in PowerShell) for this property.
Running the PowerShell just presented, we get only one matching group back:
Frankly, that’s one more group than I originally expected, so I should probably take a closer look in the ol’ family site collection …
Summary
I hope this helped you (and Bilal) understand that there is a method to PowerShell’s madness. We just need to lean on .NET and objected oriented concepts a bit to help us get what we want.
The filtering I demonstrated was pretty basic, and there are numerous ways to take it further and get more specific in your filtering logic/expressions. If you weren’t already comfortable with filtering, I hope you now know that it isn’t really that hard.
If I happened to skip or gloss over something important, please leave me a note in the Comments section below. My goal was to provide a complete-enough picture to build some confidence – so that the next time you need to work with objects and filter them in PowerShell, you’ll feel comfortable doing so.
If you need the what’s what on CDNs (content delivery networks), this is a bit of quick reading that will get you up to speed with what a CDN is, how to configure your SPO tenant to use a CDN, and the benefits that CDNs can bring.
The (Not Entirely Obvious) TL;DR Answer
Since I’m taking the time to write about the topic, you can safely guess that yes, CDNs make a difference withSPO page operations. In many cases, proper CDN configuration will make a substantial difference in SPO page performance. So enable CDN use NOW!
The Basis For That Answer: Introduction
Knowing that some folks simply want the answer up-front, I hope that I’ve satisfied their curiosity. The rest of this post is dedicated to explaining content delivery networks (CDNs), how they operate, and how you can easily enable them for use within your SharePoint Online (SPO) sites.
Let me first address a misconception that I sometimes encountered among SPO administrators and developers (including some MVPs) – that being that CDNs don’t really “do a whole lot” to help site and/or page performance. Sure, usage of a CDN is recommended … but a common misunderstanding is that a CDN is really more of a “nice-to-have” than “need-to-have” element for SPO sites. Of the people saying such things, oftentimes that judgment comes without any real research, knowledge, or testing. Skeptics typically haven’t read the documentation (the “non-RTFM crowd”) and haven’t actually spent any time profiling and troubleshooting the performance of SPO sites. Since I enjoy addressing perf. problems and challenges, I’ve been fortunate to experience firsthand the benefits that CDNs can bring. By the end of this post, I hope I’ll have made converts of a CDN skeptic or two.
What Is A CDN?
A CDN is a Content Delivery Network. There are a lot of (good) web resources that describe and illustrate what CDNs are and how they generally operate (like this one and this one), so I’m not going to attempt to “add value” with my own spin. I will simply call attention to a couple of the key characteristics that we really care about in our use of CDNs with SPO.
A CDN, at its core, can be thought of as a system of distributed (typically geographically so) servers for caching and offloading of SPO content. Rather than needing to go to the Microsoft network and data center where your tenant is located in order to fetch certain files from SPO, your browser can instead go to a (geographically) closer CDN server to get those same files.
By virtue of going to a closer CDN instead of the Microsoft network, the chance that you’ll have a “bigger pipe” with more bandwidth – and less latency/delay – are greater. This usually translates directly to an improvement in performance.
In addition to giving us the opportunity to download certain SPO files faster and with less delay, CDNs can do other things to improve the experience for the SPO files they serve. For instance, CDN servers can pass files back to the browser with cache-control headers that allow browsers to re-serve downloaded files to other users (i.e, to users who haven’t actually download the files), store downloaded files locally (to avoid having to download them again for a period of time), and more.
If you didn’t know about CDNs prior to this post, or didn’t understand how they could help you, I hope you’re beginning to see the possibilities!
The Arrival Of The Office 365 CDN
It wasn’t all that long ago that Microsoft was a bit more “modest” in its use of CDNs. Microsoft certainly made use of them, but prior to the implementation of its own content delivery networks, Microsoft frequently turned to a company called Akamai for CDN support.
Back then, if you were attempting to download a large file from Microsoft (think DVD images, ISO files, etc.), then there was a good change that the download link your browser would receive (from Microsoft’s servers) would actually point to an Akamai edge node near your location geographically instead of a Microsoft destination.
Fast forward to today. In addition to utilizing third-party CDNs like those deployed by Akamai, Microsoft has built (and is improving) their own first-party CDNs. There are a couple of benefits to this. First, many data regulations you may be subject to that prevent third-party housing of your data (yes, even in temporary locations like a CDN) can be largely avoided. In the case of CDNs that Microsoft is running, there is no hand-off to a third party and thus much less practical concern regarding who is housing your data.
Second, with their own CDNs, Microsoft has a lot more latitude and ability to extend the specifics of CDN configuration and operation its customers. And that’s what they’ve done with the Office 365 CDN.
Set Up The O365 CDN For Tenant’s Use
Now we’re talking! This next part is particularly important, and it’s what drove the creation of this post. It’s also the one bit of information that I promised Scott Stewart at Microsoft that I would try to get “out in the wild” as quickly and as visibly as possible.
So, if you remember nothing else from this post,please remember this:
Set-SPOTenantCdnEnabled -CdnType Public -Enable $true
That is the line of PowerShell that needs to be executed (against your SPO tenant, so you need to have a connection to your tenant established first) to enable transparent CDN support for public files. Run that, and non-sensitive files of public origin from SPO will begin getting cached in a CDN and served from there.
The line of PowerShell I shared goes through the SharePoint Online Management Shell – something most organizations using SPO (and their admins in particular) have installed somewhere.
Set-PnPTenantCdnEnabled -CdnType Public -Enable $true
No matter how you enable the CDN, it should be noted that the PowerShell I’ve elected to share (above) enables CDN usage for files of public origin only. It is easy enough to alter the parameters being passed in our PowerShell command so as to cover all files, public and private, by switching -CdnType to Both (with the SPO management shell) or executing another line of PowerShell after the first that swaps –type Public with –type Private (in the case of the SharePointPnP PowerShell module).
The reason I chose only public enablement is because your organization may be bound by restrictions or policies that prohibit or limit CDN use with private files. This is discussed a bit in the O365 CDN post originally cited, but it’s best to do your own research.
Enabling CDN support for public files, however, is considered to be safe in general.
What Sort Of Improvements Can I Potentially See?
I’ve got a series of images that I use to illustrate performance improvements when files are served via CDN instead of SPO list/library, and those files are from Microsoft. Thankfully, MS makes the images I tend to use (and a discussion of them) free available, and they are presented at this link for your reading and reference.
The example that is called out in the link I just shared involves offloading of the jQuery JavaScript library from SPO to CDN. The real world numbers that were captured reduced fetch-and-load time from just over 1.5 seconds to less than half a second (<500ms). That is no small change … and that’s for just one file!
The Other (Secret) Benefit Of CDNs
I guess “Secret” is technically the wrong choice of term here. A more accurate description would be to say that I seldom hear or see anyone talking about another CDN benefit I consider to be very important and significant. That benefit, quite simply, involves improving file fetching and retrieval parallelism when a web page and associated assets (CSS, JS, images, etc.) are requested for download by your browser. In plain English: CDNs typically improve file downloading by allowing the browser to issue a greater number of concurrent file requests.
To help with this concept and its explanation, I’ve created a couple of diagrams that I’ll share with you. The first one appears below, and it is meant to represent the series of steps a browser might execute when retrieving everything needed to show a (SharePoint/SPO) page. As we’ve talked about, what is commonly thought of as a single page in a SharePoint site is, more accurately, a page containing all sorts of dependent assets: image files, JavaScript files, cascading style sheets, and a whole bunch more.
A request for a SharePoint page housed at http://www.thesite.com might start out with one request, but your browser is going to need all of the files referenced within the context of that page (default.aspx, in our case) to render correctly. See below:
To get what’s needed to successfully render the example SharePoint page without CDN support, we follow the numbers:
That page request goes to (and is served by) the web server/front-end that can return the page.
Our page needs other files to render properly, like styling.css, logo.png, functions.js, and more. These get queued-up and returned according to some rules – more on this in a minute.
In step four (4), files get returned to the browser. Notice I say “no more than six at a time” in the illustration. That’s important and will come into play once we start introducing CDN support to the page/site.
Section eight (8) of the HTTP specification (RFC 2616) specifically addresses HTTP connections, how they should be handled, how proxies should be negotiated, etc. For our purposes, the practical implementation of the HTTP specification by modern browsers generally limits the number of concurrent/active connections a browser can have to any given host or URL to six (6).
Notice how I worded that last sentence. Since you folks are smart cookies, I’ll bet you’re already thinking “Wait a minute. CDNs typically have different URLs/hosts from the sites they cache” and you’re imaging what happens (or can happen) when a new source (i.e., different host/URL) is introduced.
This illustration roughly outlines the fetch process when a CDN is involved:
Steps one (1) through four (4) of the fetch process with a CDN are basically still the same as was illustrated without a CDN a bit earlier. When the page is served-up in step three (3) and returned in step four (4), though, there are some differences and additional activity taking place:
Since at least one CDN is in-use for the SPO environment, some of the resource links within the page that is returned will have different URLs. For instance, whereas styling.css was previously served from the SPO environment in the non-CDN example, it might now be referenced through the CDN host shown as http://cdn.source.com/styling.css
The requested file is retrieved, and …
Files come back to the client browser from the CDN at the same time they’re being passed-back from the SPO environment.
Since we’re dealing with two different URLs/hosts in our CDN example (http://www.thesite.com and cdn.source.com), our original six (6) file concurrent download limitation transforms into a 12 file limitation (two hosts serving six files a time, 2 x 6 = 12).
Whether or not the CDN-based process is ultimately faster than without a CDN depends on a great many factors: your Internet bandwidth, the performance of your computer, the complexity/structure of the page being served-up, and more. In the majority of cases, though, at least some performance improvement is observed. In many cases, the improvement can be quite substantial (as referenced and discussed earlier).
Additional Note: 8/24/2020
In a bit of laziness on my part, I didn’t do a prior article search before writing this post. As fate would have it, Bob German (a friend and fellow MVP – well, he was an MVP prior to joining Microsoft a couple of years back) wrote a great post at the end of 2017 that I became aware of this morning with a series of tweets. Bob’s post is called “Choosing a CDN for SharePoint Client Solutions” and is a bit more developer-oriented. That being said, it’s a fantastic post with good information that is a great additional read if you’re looking for more material and/or a slightly different perspective. Nice work, Bob!
Post Update: 8/26/2020
Anders Rask was kind enough to point out that the PnP PowerShell line I originally had listed wasn’t, in fact, PnP PowerShell. That specific line of PowerShell has since been updated to reflect the correct way of altering a tenant’s CDN with the PnP PowerShell cmdlets. Many thanks for the catch, Anders!
Conclusion
So, to sum-up: enable CDN use within your SPO tenant. The benefits are compelling!
Recently, I was working with a client that had a specific need for SharePoint folders. The client was going to be moving large numbers of records (mostly PDF files) from an old records management system they had on-premises to SharePoint Online (SPO), and the way that the client’s records management system kept some types of metadata associated with the records it applied to was by placing the records in a particular “container;” i.e., the container itself had certain properties, and the placement of records within that container would, by extension, mean that those records would possess the same properties.
“Container,” in this case, is really synonymous with “file folder” for the purposes of this discussion. Placement of a file within a folder arbitrarily possessing the color “blue,” for instance, means that the file itself should also possess the color blue by extension, as shown on the left. All the files in the blue folder are therefore blue themselves.
Yeah, But Metadata?
Bear with me, I’m getting there.
These days, everyone who owns a computer has at least a working understanding or grasp of how files and folders interact on their desktop or laptop computer. The Windows File System does a dandy job of modelling the virtual constructs of these real-world items. Files go into folders – easy enough.
To continue with the file folder analogy: it’s not at all uncommon for folks to write on folders to add information that helps them identify and categorize the papers and documents contained within folder. So, it’s perfectly reasonable to expect that people would want to write on folders (in the virtual sense) when creating them in SharePoint to help identify the files placed within.
And that’s precisely where things get a little challenging.
What’s The Problem?
Although Windows folders can track metadata or properties in a limited sense, accessing and interacting with that metadata can be hit or miss. For instance, my Camera Roll folder on the right has metadata indicating when it was created. It probably has some additional properties over on the Customize tab (I’m guessing) that may be accessible, but they may be read-only. And if I wanted to add my own arbitrary properties to describe this folder, such as the previous “blue” designation of color, I’d be hard-pressed to do so.
Brief aside: we almost had files and folders with genuine metadata back in the Windows Vista days with WinFS, or Windows Future Storage. Unfortunately, WinFS never saw the light of day ... which is tragic, because I think it would have helped tremendously with the management, storage, and classification of files.
If you’ve ever tried to work with folders in SharePoint document libraries, you already know that the situation isn’t much better. SharePoint document library folders are not really friendly from a metadata perspective, either. And I want to be clear about something here: I’m using the term “metadata” not in the narrow, managed metadata sense, but rather in the broader sense; i.e., any additional (field) data that could be applied to a folder.
But SharePoint Folders Support Metadata, Right?
Many folks who ask that question feel like SharePoint folders should support metadata without having any sense of certainty about that feeling … and that’s a horrible state to find yourself in. So let’s clear things up a bit.
“Yes,” SharePoint folders do support metadata/field data – and have all along. We just have to jump through some hoops to understand a few things up-front in order to effectively work with that metadata. In particular, we’ve been operating with a particular working understanding of files and folders – namely, that files go into folders.
When it comes to SharePoint, this model isn’t entirely accurate. Allow me to take a shot at explaining something that is probably more complicated than the average SharePoint user realizes.
Elaborating Further (a.k.a., “Words Alone Won’t Work”)
When our kids get flustered and stop speaking English or just start making noise/emoting, we’ll sometimes yell at them to “use your words.” I was thinking about how I might explain the relationships that exist between properties, list items, files, and folders in SharePoint … and I gave up. This was a case (to me) where a picture was worth a thousand words.
I thought “a class diagram would really help here” and then set about trying to find an appropriate diagram on the Internet that would represent what I was trying to illustrate. After about 20 minutes of searching, following links, reviewing some (not-so-great) UML diagrams, and ultimately coming up empty-handed, I put this UML class diagram together:
UML Class Diagram Illustrating SharePoint List Items (SPListItem Objects) and Key Relationships
If you don’t “speak” UML, I’ll try to highlight the key classes and relevant relationships for you:
Every SPList has a collection of zero or more SPListItemobjects. In plain English: every SharePoint list can possess any number (including zero) of list items. Probably no surprise there.
SPListItem objects are simple to grasp in concept, but they are remarkably complex in design and implementation. One feature that is fairly common among many SharePoint object types is a collection of arbitrary properties (or a “property bag”), and an SPListItem certainly adheres to this. These properties are accessed, somewhat unsurprisingly, through the Properties property of the SPListItem which is implemented as a .NET Hashtable object. The Properties collection can contain any number (including zero) of key/value pairs.
Remember the part about folders containing files – and my remark about that not being entirely accurate? Well you might be able to see why that is from the class diagram. Technically, an SPListItem can be associated with an SPFolder(through the Folder property of the SPListItem) and an SPFile(through the File property of the list item). In a self-referencing hierarchical structure of nodes and leaves, SPFile and SPFolder objects can reference other SPFile and SPFolder objects – making traversal of a folder hierarchy or file hierarchy (respectively) possible. And, like an SPListItem and many other SharePoint object types, files and folders have an exposed Properties property that goes to – you guessed it – that Hashtablecontaining the same key/value pairs as our list item.
Up until now, it probably wasn’t too hard to follow along. But in an effort to make nearly “everything” accessible from everywhere and every type in SharePoint, Microsoft sort of made the SharePoint object model sort of … dirty. Case in point: the Fields property or collection associated with an SPListItem. This is a collection of SPFieldobjects which are, in effect, key/value pairs on steroids. An SPField has numerous other properties and object references that I left out of my diagram to avoid confusing things further. Most SharePoint practitioners are familiar with SharePoint Fields, and they take many forms: Columns, Site Columns, etc. So a lot of that SharePoint list item data actually resides in the Fields collection. You may, however, be noticing and wondering about the relationship between SPField and the Properties Hashtable. I’ll get to that …
An SPFolder object also has access to the SPField items associated with its particular SPListItem through the folder’s ListItemAllFieldscollection. Worth noting is that this property doesn’t have backing support within the SPFolder object but is actually an alias/reference back to the parent list item and it’s Fieldscollection:
And as if to confuse matters worse, individual SPField objects can be accessed through the Properties Hashtable; or rather, the key/value data in an SPField can be accessed (both set and retrieved) as “members” of the Properties collection.
Getting at data associated with a specific SPField in this manner exposes fewer options (because we can’t access the full richness of the SPField‘s properties and methods), but it does give us a quick and relatively easy way to work with fields as properties.
Where’d You Find That? (Alternatively, How To Confirm This On Your Own)
If you’re familiar with my work or my writing, you know that I generally prefer to find (or discover) things on my own. One type of work I do that I derive great enjoyment from is what I like to call “digital spelunking.” In essence, I dive into files to figure out what they do, how they work, or sometimes even why they produce certain effects. I’ve extracted database connection strings and (unfortunately placed) credentials that were stored within files. Organizations that have suddenly found themselves without their developer have hired me to get inside their developer’s SharePoint solution packages and .NET assemblies to extract critical information – a service I offer over on Collab365 MicroJobs, if you’re interested.
To put the UML class diagram together, I opened up my copy of .NET Reflector and used it to start poking around a variety of SharePoint assemblies.
Diving into a SharePoint assembly within a WSP file
Reflector is a great product, but it isn’t free. There are free alternatives (I’ll point you to a Scott Hanselman blog post if you’re interested in disassembling on your own), and they make the job of understanding how things are connected much easier – if you speak the language.
So, we were talking about folders in SharePoint …
PowerShell Is Your Friend
I like to say that “PowerShell is like methadone for developers.” If I want to get going and start doing some C# development, but I can’t for some reason, then writing some PowerShell script will satisfy my need to code … but it’s not a replacement.
As it turns out, the SharePoint PnP (Patterns and Practices) crew put together a number of PowerShell cmdlets for working with files and folders, and they do a fantastic job of giving PowerShell script writers the tools they need to get things done in SharePoint farms, both on-premises and in the cloud. But they chose not to expose metadata and properties with their cmdlets, and I’m willing to hazard a guess as to why. Since you’re now familiar with the SPListItem type and the class diagram I presented earlier, I’ll wager you are too.
Well, the nice thing about PowerShell is that it gives us full access to the richness of the .NET Framework. The SPFolder objects that are returned from using cmdlets like Get-PnPFolder and Resolve-PnPFolder still have all the methods and properties you would expect them to have. So accessing and manipulating folder metadata isn’t all that hard to do. You just need write PowerShell with a bit of a .NET developer’s eye.
Everything Is Awesome!
In my company’s SharePoint Online tenant, I maintain a demo site I created for the express purpose of metadata demonstrations. Behold!
Don’t you wish you had a site as cool as this?
I built the site back in 2014 (in the earlier days of SharePoint Online), so no, it doesn’t have any of the modern goodness we’ve come to expect from an SPO site. I’ve often wondered if the Lego Group uses SharePoint. Maybe Andrew Connell knows. He has really diversified his portfolio in terms of technology, but when I think “legos” and “SharePoint,” AC is the first guy who comes to mind. He goes pretty bonkers over his legos.
Anyway, the Lego site will be the perfect testbed for some SharePoint folder action. Let’s say I need to create a set of folders in the Unorganized Bricks document library:
The “busted hotness” that is my Lego demo site
We need to change the way we’re looking at the site to make our metadata scenario more visible, so I switched the view and engaged Quick Edit mode:
Editing a folder’s metadata in Quick Edit mode
Quick Edit mode is one of only a few ways that folder metadata can be accessed. It’s a good thing that Microsoft dumped all the old ActiveX controls (remember those?) that SharePoint previously used for things like Quick Edit and went to HTML+JavaScript implementations. The current Quick Edit implementation has actually been getting some new(er) capabilities, as well. Most of them require modern lists and libraries, though, so I’m not sure my stallwart lego libraries will demonstrate any of that.
The Script
I mentioned a (CreateSPFolders.ps1) script to create folders in our document library, so here’s one that will ingest a comma-separated value (CSV) file to create folders and assign metadata value – assuming the fields/columns specified within the CSV already exist within the document library. If the fields don’t already exist, there are a separate set of steps you’d need to undertake to get those ready – and I won’t go into those here (this blog post is getting long enough already).
The CSV file that the script looks for should be named folders.csv, and it should reside within the same file location as the script itself. The CSV file format is pretty flexible; the first row contains column/field names with the exception of the first column. The first column contains the relative path of the folder that should be created in the document library. “Relative,” in this case, has a point of reference beginning at the root of the document library. Additional CSV columns beyond the first will be interpreted as metadata/field data for assignment, with the column header being matched to the SharePoint document library’s field names. Sample folders.csv:
In the case of my document library, there are only a couple of metadata fields that I can populate: Piece Count and My Design? Running the CreateSPFolders.ps1 script yields the following:
The Test document library following CreateSPFolders.ps1 run with the previously shown folders.csv
So, What Happened Here?
There are a number of script elements worth pointing out, as well as some effects and behaviors that are worth highlighting.
You may have noticed that although the folders got created and the Piece Count field was successfully populated for each folder, our My Design? field did not get populated. This happened because the My Design? field is a boolean field (Yes/No in SharePoint), and we’re putting values in as strings/straight text:
$folderProps[$mappedProp] = $propVal
No data type coercion is attempted. If we wanted the value to “stick,” we’d have had to insert a PowerShell $true or $false. Obviously, we’d need additional logic to attempt data type interpretations of the values in the folders.csv file, or apply what we know of the field from our preprocessing of the document library’s fields collection. I didn’t go into that here to keep things as simple as I could.
The names of the fields in the document library’s Propertiescollection are case-sensitive, so when you are assigning field values by adding them to the Dictionary, you must use the case of the fieldname you want to affect. If you don’t, nothing will stop you from adding that field value to the Properties collection, but you won’t be able to access the value or view it in SharePoint. For example:
Properties collection of the Test document library. VSCode debug data.
If I had assigned “piece count” instead of “Piece Count” (notice that case difference), it would have appeared in the collection but not in SharePoint.
Note, too, that My Design? was actually added to the Dictionary and case was observed. But since the value was added as straight text and not as a boolean data type, it does not appear in the SharePoint Quick Edit View:
Another watch-out with field values on folders that sometimes causes some confusion is that after changes are made and completed on a specific folder, it’s best to call the Update() method on the folder and then ExecuteQuery() on the folder’s Context. Doing so will ensure the changes are propagated back to SPO and applied to the underlying document library:
#Propagate the changes back to SPO to ensure they stick$workingFolder.Update() $ctx.ExecuteQuery()
If there’s ever any question regarding whether or not there are changes that need to go back to SPO, the HasPendingRequestflag of the Context object can be consulted and used to determine whether or not a server round trip should be made.
Conclusion
This post started off as something simple but quickly grew into something more. At the very least, I hope some of you find it handy as a reference and a script source. Let me know your thoughts/feedback!
Sometime in the months leading up to the conference, I received an email from out-of-the-blue from a guy named Scott Stewart – who at the time was a Senior Program Manager for OneDrive and SharePoint Engineering. In the email, Scott introduced himself, what he did in his role, and suggested that we collaborate together for the performance session I was slated to deliver at SPCNA.
I came to understand that Scott and his team were responsible for addressing and remedying many of the production performance issues that arose in SharePoint Online (SPO). The more that Scott and I chatted, the more it sounded like we were preaching many of the same things when it came to performance.
One thing Scott revealed to me was that at the time, his team had been working on a tool to help diagnose SPO performance issues. The tool was projected to be ready around the time that SPCNA was happening, so I asked him if he’d like to co-present the performance session with me and announce the tool to an audience that would undoubtedly be eager to hear the news. Thankfully, he agreed!
The audience for our performance talk at SPCNA 2018
Scott demo’d version one (really it was more like a beta) during our talk, and the demo demons got the better of him … but shortly after the conference, v1.0 of the tool went live and was available to download as a Chrome browser extension.
So, what does it do?
Simply put, the Page Diagnostics Tool for SharePoint analyzes your browser’s interaction with SPO and points out conditions and configurations that might be adversely affecting your page’s performance.
The first version of the tool only worked for classic publishing pages. And as a tool, it was only available as a Google Chrome Extension:
The Page Diagnostics for SharePoint extension in the Google Chrome Store
The second iteration of the tool that was released last Thursday addresses one of those limitations: it analyzes both modern and classic SharePoint pages. So, you’re covered no matter what’s on your SPO site.
Many of the adverse performance conditions and scenarios I’ve covered while speaking and in blog posts (such as this one here) are analyzed and called-out by the tool, as well as many other things/conditions, such as navigational style used, whether or not content deployment networks (CDNs) are used by your pages, and quite a few more.
And finally, the tool provides a simple mechanism for retrieving round-trip times for pages and page resource requests. It eliminates the need to pull up Fiddler or your browser’s debug tools to try and track down the right numbers from a scrolling list of potentially hundreds of requests and responses.
How Do I Use It?
It’s easy, but I’ll summarize it for you here.
1. Open the Chrome Web Store. Currently, the extension is only available for Google Chrome. Open Chrome and navigate to https://chrome.google.com/webstore/search/sharepoint directly or search for “SharePoint” in the Chrome Web Store. However you choose to do it, you should see the Page Diagnostics Tool for SharePoint entry within the list of results as shown below.
2. Add the Extension to Chrome. Click the Add to Chrome button. You’ll be taken directly to the diagnostic tool’s specific extension page, and then Chrome will pop up a dialog like the one seen below. The dialog will describe what the tool will be able to do once you install it, and yes: you have to click Add Extension to accept what the dialog is telling you and to actually activate the extension in your browser.
3. Navigate to a SharePoint Online page to begin diagnosing it. Once you’ve got the extension installed, you should have the following icon in the tool area to the right of the URL/address bar in Chrome:
To illustrate how the tool works, I navigated to a modern Communication Site in my Bitstream Foundry tenant:
I then clicked on the SharePoint Page Diagnostics Tool icon in the upper right of the browser (as shown above). Doing so brings up the Page Diagnostics dialog and gives me some options:
Kicking off an analysis of the current page is as simple as clicking the Start button as shown above. Once you do so, the page will reload and the Tool dialog will change several times over the course of a handful of seconds based on what it’s loading, analyzing, and attempting to do.
When the tool has completed its analysis and is ready to share some recommendations, the dialog will change once again to show something similar to what appears below.
Right off the bat, you can see that the Page Diagnostics Tool supplies you with important metrics like the SPRequestDuration and SPIIsLatency – two measures that are critical to determining where you might have some slowdown as called out in a previous blog post. But the tool doesn’t stop there.
The tool does many other things – like look at the size of your images, whether or not you’re using structural navigation (because structural navigation is oh so bad for your SPO site performance), if you’re using content delivery networks (CDNs) for frequently used scripts and resources, and a whole lot more.
Let’s drill into one of the problem items it calls out on one of my pages:
The tool explains to me, in plain English, what is wrong: Large images detected. An image I’m using is too large (i.e., larger than 300KB). It supplies the URL of the image in question so that I’m not left wondering which image it’s calling out. And if I want to know why 300KB is special or simply learn about the best way to handle images in SharePoint Online, there’s a Learn More link. Clicking that link takes me to this page in Microsoft Docs:
Targeted and detailed guidance – exactly what you need in order to do some site fixup/cleanup in the name of improving performance.
Wrapping-Up
There’s more that the tool can do – like provide round trip times for pages and assets within those pages, as well as supply a couple of data export options if you want to look at the client/server page conversation in a tool that has more capabilities.
As a one-stop shop tool, though, I’m going to basically start recommending that everyone with an SPO site start downloading the tool for use within their own tenants. There is simply no other tool that is easier and more powerful for SharePoint Online sites. And the price point is perfect: FREE!
The next time you see Scott Stewart, buy him a beer to thank him for giving us something usable in the fight against poorly performing SPO sites.
In this post, I’ll show you how to obtain page performance core metrics from Modern SharePoint Online pages. It’s easier and more reliable than trying to obtain the same data from classic pages.
Background
It was quite some time ago that I wrote my Five-Minute Page Performance Troubleshooting Guide for SharePoint Online – a little over a year-and-a-half ago, actually. Since that time, SharePoint Online (SPO) has continued to evolve relentlessly. In fact, one slide I’ve gotten into the habit of showing during my SPO talks and presentations is the following:
The slide usually gets the desired response of laughter from attendees, but it’s something I feel I have to say … because like so many things that seem obvious, there’s some real life basis for the inclusion of the slide:
The exchange shown above was the result of someone commenting on a post I had shared about limitations I was running into with the SharePoint App Model. The issue didn’t have a solution or workaround at the time I’d written my post, but Microsoft had addressed it sometime later.
This brief exchange highlights one of the other points I try hard to make while speaking: PAY ATTENTION TO DATES! It’s not safe to assume (if it ever was) that something you read online will stay accurate and/or relevant indefinitely.
In any case, I realize that much of what I share has a “born on date,” for lack of a better label. I’ll continue to share information; just note when something was written.
End of (slight) rant. Back to the real topic of this post.
Modern Pages
Since I had written the previous performance article, Microsoft’s been working hard to complete the transition to Modern SharePoint in SPO. I feel it’s a solid move on their part for a variety of reasons. Modern pages (particularly pages in communication sites) are much more WYSIWYG in nature, and SharePoint Framework (SPFx) web parts on modern pages make a whole lot of sense from a scalability perspective; after all, why assume load on the server (with classic web parts) when you can push the load to the client and use all the extra desktop/laptop power?
As good as they are, though, modern pages don’t obey the standard response header approach to sharing performance metrics. But not to worry: they do things more consistently and reliably (in my opinion).
Performance on a Modern Page
SPRequestDuration (the amount of time the server spent processing the page request) and (SP)IISLatency (the amount of time the page request waited on the server before getting processed) are critical to know when trying to diagnose potential page performance issues. Both of these are reported in milliseconds and give us some insight into what’s happening on the server-side of the performance equation.
Instead of trying to convey these values with response headers (as classic pages do – most of the time), modern pages share the same data within the body of the page itself.
Consider the following page modern page:
If this were a classic publishing page and we wanted to get the (SP)IISLatency and SPRequestDuration, we’d need to use our browser’s <F12> dev tools or something like Fiddler.
For modern pages, things are easier. We turn instead to the page source – not the response headers. Grab the page source (by right-clicking and selecting View page source) …
… and you’ll see something like the following:
Now, I’ll be the first to admit that you’ve got to have some sense of what you’re seeking within the page source – there’s a lot of stuff to parse through. Doing a simple <CTRL><F> search for iislatency or requestduration will land you on the content of interest. We’re interested in the metrics reported within the perf section:
The content of interest will be simple text, but the text is a JSON object that can be crunched to display values that are a bit easier to read:
The other thing you’ll notice is that a lot of additional metrics are reported along with the page processing metrics we’ve been looking at. In a future post, I’ll try to break some of these down for you.
Conclusion
“Modern” is the future of SharePoint Online. If you haven’t yet embraced modern lists and pages, consider dipping your toe in the waters. As we’ve seen in this post, Modern also makes it easier to obtain performance metrics for our pages – something that will make page performance troubleshooting significantly more predictable and consistent.
I regularly hear from SharePoint Online customers that their pages are slow … but they don’t know where to start troubleshooting. Is it the SPO servers? The network? Their page(s)? In this post, I’ll show you how to determine the general source of your slow pages in five minutes or less. It won’t solve your slow page(s) problem, but it will give you enough direction to know where to focus further analysis.
UPDATE (3/20/2018): As most of you who have been following-along in your own tenants know, this issue wasn’t actually truly resolved last September. For a while, in some cases, it looked like the SPIisLatency and SPRequestDuration headers came back. But the victory was fleeting, and since that time I’ve continued to get comments from people saying “but I don’t see them!” And while I had the headers for a while in my tenant, I haven’t seen them in any predictable fashion.
The good news is that after much hounding and making myself a royal pain-in-the-tuckus to Bill Baer and others at Microsoft, it looks like we FINALLY have the right engineering and dev teams engaged to look at this. We got traction on it this week, with multiple repro scenarios and Fiddler traces being passed around … so I’m truly hopeful we’ll see something before long. Stay tuned!
UPDATE (9/2/2017): As I was preparing slides for my IT/DevConnections talks, I decided to check on the issue of the missing Page Response Headers (SPIisLatency and SPRequestDuration). I went through three different tenants and several pages, and I’m happy to report that the headers now appear to be showing consistently. My thanks to Microsoft (I’ll credit Chris McNulty and Bill Baer – I had been pestering them) for rectifying the situation!
“Why is it so slow?” That’s how nearly every performance conversation I’ve ever had begins.
No one likes a slow intranet page, and everyone expects the intranet to just “come up” when they pop the URL into their favorite browser. From an end-user’s perspective, it doesn’t matter what’s happening on the back-end as long as the page appears quickly when someone tries to navigate to it.
SharePoint Online is a big black box to many of its users and consumers. They don’t understand what it takes to build an intranet, nor should they have to. The only thing that really matters to them is that they can bring up a browser, type in a URL, and quickly arrive at a landing page. The burden of ensuring that the site is optimized for fast loading falls to the folks in IT who are supposed to understand how everything works.
If you’re one of those folks in IT who is supposed to understand how everything works with SharePoint Online but doesn’t, then this blog post is for you. Don’t worry – I know there’s a lot to SharePoint Online, but performing some basic troubleshooting analysis for slow pages in SharePoint Online is pretty straightforward. I’ll share with you a handful of techniques to quickly ascertain if the reason for your slow pages is due to the content within the pages themselves, if the issue is network-related, or if there might be something else happening that is beyond your control.
Your Toolset
The first step in your performance troubleshooting adventure begins by opening up your browser from a client workstation. Everyone has a favorite browser, but I’m going to use and recommend Internet Explorer for this exercise because it has a solid set of development tools to assist you in finding and quantifying performance issues. In particular, it is able to chronologically list and detail the series of interactions that take place between your browser and the SharePoint Online web front-ends (WFEs) that are responding to your requests.
When recommending IE, some people ask “how come you don’t use Fiddler?” It’s a good question, and when I first started showing people how to do some quick troubleshooting, I’d do so with Fiddler. If you’re just starting out, though, Fiddler comes with one really big gotcha: operating inside an SSL tunnel. To get Fiddler (which is a transparent proxy) working with SSL, there is some non-trivial setup required involving certificate trusts. Since this is intended to be a quick and basic troubleshooting exercise, I figure it’s better to sidestep the issue altogether and use IE (which requires no special setup).
The Setup
To make this work, let us assume that I am attempting to profile the Bitstream Foundry (my company) intranet home page in order to understand how well it works – or doesn’t. My intranet home page is pretty plain by most intranet standards (remember: I’m a developer and IT Pro – not a designer), but it’s sufficient for purposes of discussion.
Step 1. Open Your Browser
I start by opening Internet Explorer and navigating to the Bitstream Foundry intranet home page at https://bitstreamfoundry.sharepoint.com. Once I move past the sign-in prompts, I’m shown my home page:
My home page has very little on it right now (I’m still trying to decide what would go best in the main region), but it is a SharePoint Online (SPO) page and it does work as a target for discussion purposes.
Step 2. Access the Developer Tools
Accessing the developer tools within Internet Explorer is extremely simple: either press F12, or go to the browser’s gear icon and select F12 Developer Tools from the drop-down that appears as seen below:
Doing either of these will pop-open the developer tools as either a stand-alone window or as a pane on the lower half of the browser as shown below:
Step 3. PREPARE TO CAPTURE
When the developer tools first open, they’re commonly set to viewing the page structure on the DOM Explorer tab. For purposes of this troubleshooting exercise, we need to be on the Network tab so we can profile each of the calls the browser makes to the SPO WFE.
Select the Network tab and then select the “Always refresh from server” button as highlighted below in red.
The Network tab is going to allow us to capture the series of exchanges between the SharePoint WFE and our browser as the browser fetches the elements needed to render the page. The “Always refresh from server” button is going to remove client-side caching from the picture by forcing the browser to always re-fetch all referenced content – even if it has a valid copy of one or more assets in the browser cache. This helps to achieve a consistent set of timing values between calls, and it’s also going simulate someone’s first-time visit to the page (which typically takes longer than subsequent visits) more accurately.
Step 4: Capture the Exchange
The next step is to capture the series of exchanges between IE and SPO. To do this, simply refresh the page by pressing the browsers Refresh button, pressing , or going to the browser’s address bar and re-issuing the page request.
The contents of the window on the Network tab will clear, and as content begins to flow into the browser, entries will appear on the screen. For every request that IE makes of SharePoint Online, a new line/entry will appear. It will probably take a handful of seconds to retrieve all page assets, and it’s not uncommon for a SharePoint page to have upwards of 75 to 100 resources (or more) to load.
Strictly speaking, you shouldn’t have to stop the capture once the page has loaded, but there are several reasons why you would want to. First, you will eventually retrieve all SharePoint assets necessary to render the page. If you continue to capture beyond this point, you’ll see the number of requests (represented in the bottom bar of the browser – the number is 83 requests in the screenshot above) continue to tick up. It will slowly go up over time and it’s not due to the contents of the SharePoint page – it’s due to Office 365.
If you look at the last entry in the screenshot above, you’ll see that it’s a request to https://outlook.office365.com/owa. In short: this is due to a background process that allows Exchange to notify you when you receive new messages and calendar/event notifications. See how the Protocol and Result/Description columns indicate a (Pending) state?
If you get to this point and additional SharePoint elements are no longer loading, press the red “recording stop” button in the toolbar of Network tab. This will stop the capture. Not only does this help to keep the captured trace “cleaner,” but it also prevents excessive distortion of certain values – like overall time to load and the graphical representation of the page load (shown on the far right of the Network tab) as shown below.
Step 5: Find the SharePoint Page Request
At this point, you should have a populated Network tab with the entire dialog of requests that were needed to render your page. Of these requests, the overwhelming majority of them will be for JavaScript files (.js), cascading stylesheets (.css), and images (.png, .gif, and .jpg). Only one of them will be for the actual SharePoint page itself (.aspx) … and, of course, this is the request that you need to find in the list.
My intranet home page is named Home.aspx (as can be seen in the browser address bar), so I need to find the request for Home.aspx on the Network tab. I got lucky with this dialog attempt, because Home.aspx is the first entry listed. Note that this isn’t always the case, and it’s not uncommon to find your page request 10 or 20 down in the list.
When you locate the entry in the list for your .aspx page, click on it to select it. You can confirm that you’ve selected the right entry by verifying Request URL on the Headers tab to the right of the various requests listed for the exchange with SPO (highlighted in the image above).
Step 6: Analyze the Headers
At this point, we need to shift our focus to the HTTP Response Headers that are passed back with the content of the page. Much like the request headers that the browser sends to the server to provide information about the request being made, the response headers that are sent from the server supply the browser with all sorts of additional information about the page. This can include the size of the page (Content-Length), the payload (Content-Type), whether or not the page can be cached (Cache-Control), and more.
Making sure that you have the Headers tab selected, locate and record the three response headers as shown below:
The three values we want to record are:
SPIisLatency. This is a measure of the amount of time (in milliseconds) that the request spent queued and waiting to be processed by IIS (Internet Information Services – the web server). Ideally, it should be zero or very close to zero. In my example, the SPIisLatency is 3ms.
SPRequestDuration. This is the amount of time (again, in milliseconds) that it took to process the request on the server. Basically, this is the end-to-end processing time for the page. Healthy pages range from a couple hundred milliseconds to around a second depending on the content of the page. In my example, the SPRequestDuration is 249ms.
X-SharePointHealthScore. This is the value, from zero to ten, that indicates how heavily loaded the SharePoint Server is at the time when the page was served. A score of zero means the server is not under load, while a score of ten means the server is overloaded. As the X-SharePointHealthScore goes up, the server begins to selectively suspend work designated as “low priority,” like some Timer Service jobs, Search requests, and various other low-priority tasks. ideally, this value should be zero – or close to it. In my example, the value is zero.
We can infer a great deal about the page processing and network traversal of our page request with just these three values and a final number.
A quick note (2017-07-06): For some reason, a variety of SharePoint Online sites have been returning pages without the SPIisLatency and SPRequestDuration headers lately. I don’t know why this is happening, and I’ve reached out to Microsoft to see if it’s a bug or part of some larger strategy. I don’t think it’s deliberate, because the headers provide some of the only insight end-users can get into SharePoint Online page performance. When I hear something from the product team, I’ll post it here!
The Magical Trio: SPIisLatency, SPRequestDuration, and Total Trip Time
So, you’ve now got three numbers – two of which are helpful for page profiling (SPIisLatency and SPRequestDuration), and a third number (X-SharePointHealthScore) which will tell you how stressed the server was when it served your page. What can you do with them? As it turns out, quite a bit when you combine two of the three with a fourth number.
What is the fourth number? It’s the total trip time that is reported for the page being loaded, and it represents the elapsed time from the point at which the page was requested until the time when the last byte of the page was delivered. For example, I profiled my Bunker Tuneage site. It’s a SharePoint Online site (yes, I know – I have to get it moved to another location soon), so it makes a good target for analysis:
In the above example, the three numbers we’re most interested in are:
Total Trip Time: 847.47ms
SPRequestDuration: 753ms
SPIisLatency: 0ms
If we think about what the individual values mean, we can now reason that the total amount of time spent to get the page (847.47ms), minus the total amount of time spent waiting or processing the server (753ms), should be roughly equal to the amount of time spent “elsewhere” – either in routing, traversing network boundaries, on proxies and firewalls, etc.
So, considering our numbers above, the equation looks like this:
Based on our equation, this means that approximately (this isn’t exact) 94.47ms of time was spent getting from from the SharePoint Online server to our browser – not too shabby when we consider it.
The Permutations
The numbers could come out a variety of different ways when doing this, so it’s best if we try to establish a general trend. Variability between any two runs can be significant, so it’s in your best interests to conduct a number of runs (maybe a dozen) and come up with some average values.
Regardless of the specific values themselves, there are some general conclusions we draw about each value by itself – and when it is compared to the others.
High Total Time. The total end-to-end times can vary dramatically. The examples I’ve got shown thus far demonstrate sub-second latency (i.e., hundreds of milliseconds), and any time you can get values like that, it’s nothing to complain about. When your total round trip time climbs to two or three seconds, your generally still doing pretty good. If you hit five, six, or seven+ seconds, it’s time to move on to what to see what SPRequestDuration, SPIisLatency, and the time-spent-elsewhere values say.
High SPIisLatency. If you observe consistently high SPIisLatency values, they point to there being something wrong server-side, since a high SPIisLatency suggests that requests are backing up on the server. Although I’ve never seen it, I believe you could see high SPIisLatency for a brief period of time … but during that time, I’d also expect SharePoint Online to be spinning-up additional WFEs to deal with the effects of high user load. I’ve only ever seen SPIisLatency values in the single digits before, and they’ve never lasted beyond a request or two.
High “Time Lost ‘Elsewhere.'” If you crunch the numbers in the performance equation and come up with a significant amount of time being lost “elsewhere,” it suggests that the traffic between SharePoint Online and your computer is being slowed down for some reason. It doesn’t specifically indicate what is causing the slowdown, but the slowdown could be due to any number of network conditions: excessive routing, web proxies, egressing to the Internet out-of-region (a form of excessive routing), firewall issues, or a whole host of other conditions. What represents “excessive” time spent elsewhere? Again, I can only speak to trends here, but I tend not to get too upset about anything under 1s (1000ms) being lost to other factors. When time lost elsewhere grows to be high – especially compared to SPRequestDuration – that’s when I get concerned. For example, an SPRequestDuration of 800ms with a time-lost-elsewhere value of 2500ms makes me wonder what’s happening between SharePoint Online and my computer.
High SPRequestDuration. A high SPRequestDuration value can be caused by a variety of factors, and in truth the diagnosis tends to become a bit contentious. Since a high SPRequestDuration means that a page is taking a long time to process on the server, the most common response I frequently encounter (especially among those new to SPO) is that “there’s something wrong with SharePoint Online.” I hate to be the bearer of bad tidings, but repeat after me: “The problem isn’t with SharePoint Online, it’s with my site.” That 9000ms SPRequestDuration probably has very little to do with SPO and everything to do with how you customized SharePoint, your choice of navigation style, the fact that there are two dozen “expensive” web parts on the page, or something related to that. I’m not willing to rule out a problem with a SharePoint Online tenant, but in truth I have yet to encounter it.
What Can I Do About a High SPRequestDuration?
If you don’t believe me and instead feel that the problem is with the SharePoint Online environment, the good news is that there’s an easy way to tell one way or the other … and I highly recommend doing this before calling Microsoft Support (trust me, they’ll thank you for doing so).
Believe it or not, SharePoint Online is also where OneDrive for Business data is stored. A OneDrive for Business page, at its core, is a SharePoint page with nearly no customization. Using someone’s OneDrive for Business page becomes an excellent A/B test when the performance of SharePoint Online page is sub-par. Simply load up their OneDrive for Business page and compare performance numbers to the page in question.
Revisiting my Bunker Tuneage site example, you can see that the OneDrive for Business landing page is served from the same tenant as the earlier page. If I were to compare the SPRequestDuration value of the OneDrive for Business page (223ms) with the SPRequestDuration of the SharePoint page in-question (753ms), I’d note that the values differed … but are they different enough to think something is going awry in the SPO environment?
Roughly half a second (~500ms) is indeed a difference, but it’s not enough for me to think that the online environment has problems. When I see SPRequestDuration values like 9000ms for a SharePoint page but 500ms for OneDrive for Business page, that’s when I begin to suspect something is amiss. And again: with such an extreme disparity in values, SharePoint Online is healthy (500ms), but there’s clearly something wrong with my page (9000ms).
Practical Advice
When it comes to diagnosing the root cause or causes for high SPRequestDuration values, the good news is that there are plenty of fixes that range from the simple to the quite invasive. Microsoft has taken the time to compile some of the more common causes, and I highly encourage you to take a look if you’re interested.
At the end of the day, though, sometimes you just want to know where to begin troubleshooting so that you can focus remediation efforts. If you follow the steps outlined in this blog post, I think you’ll find that the five minutes they take to execute will help to focus you in the right area.


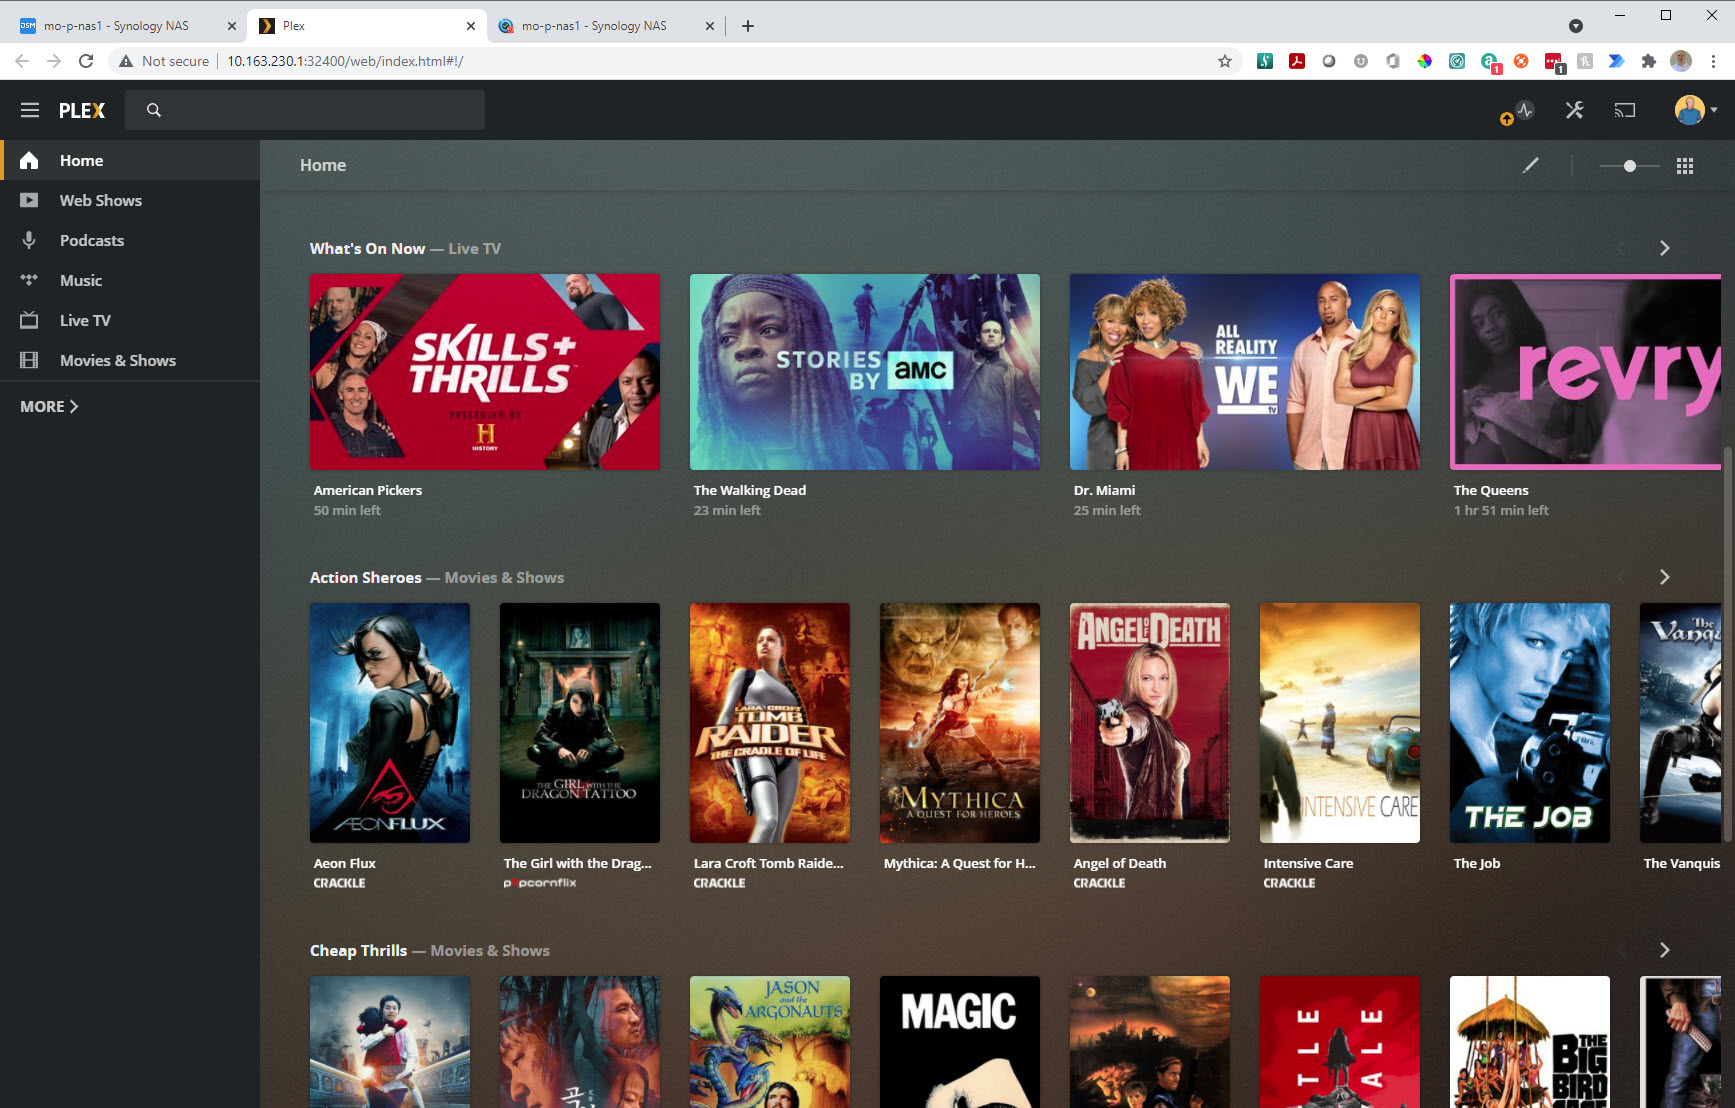
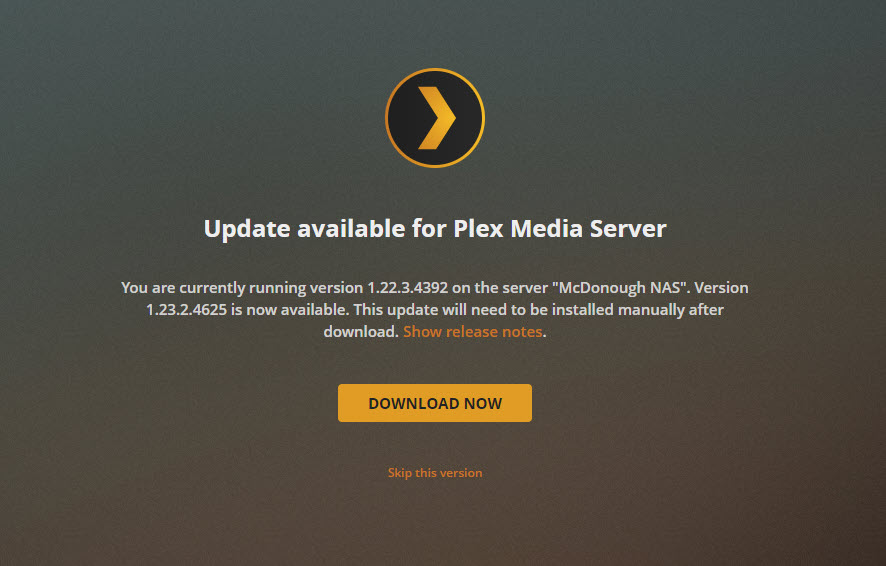
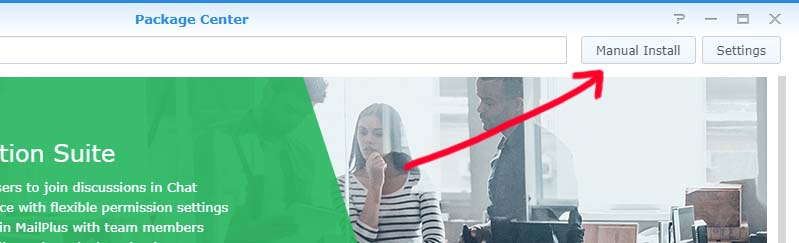


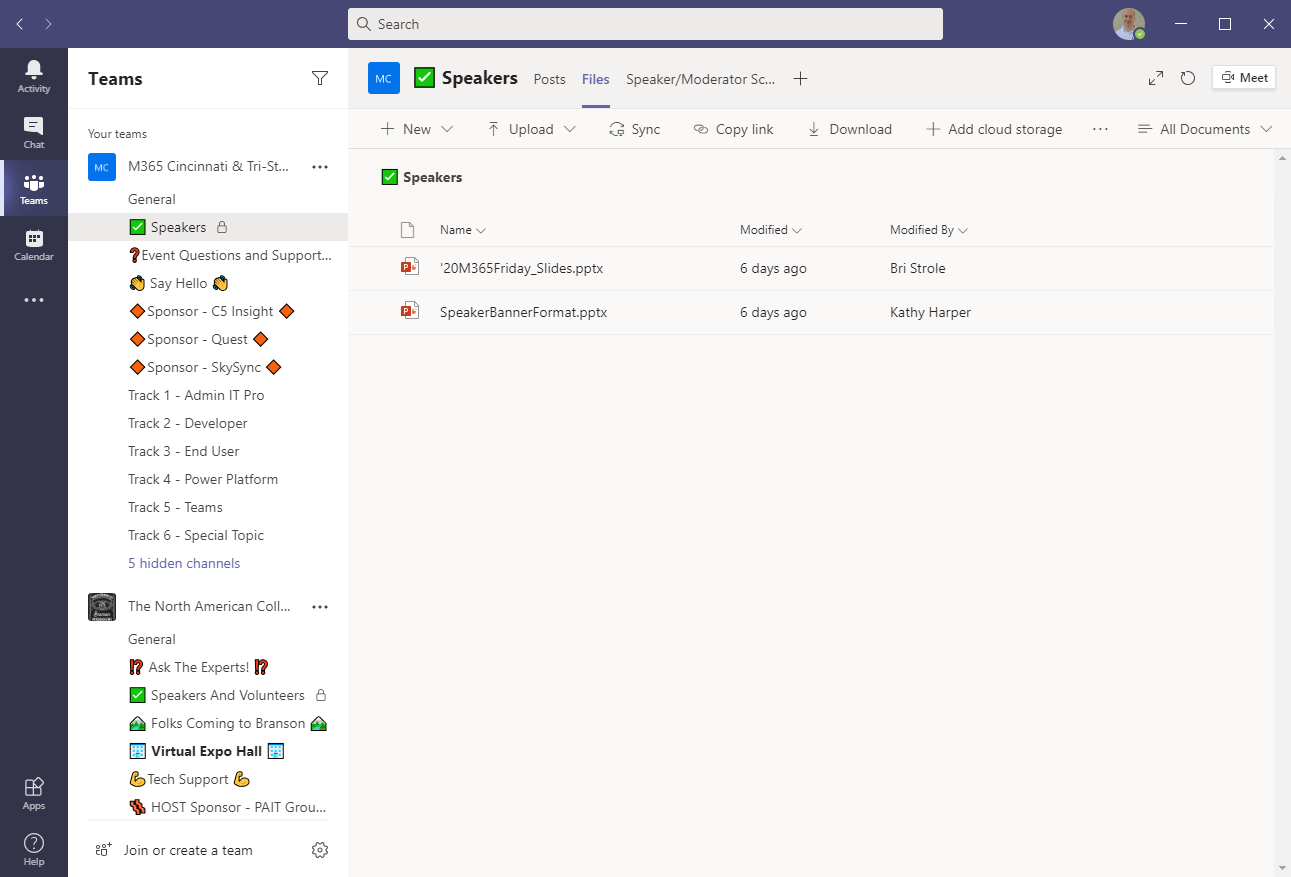

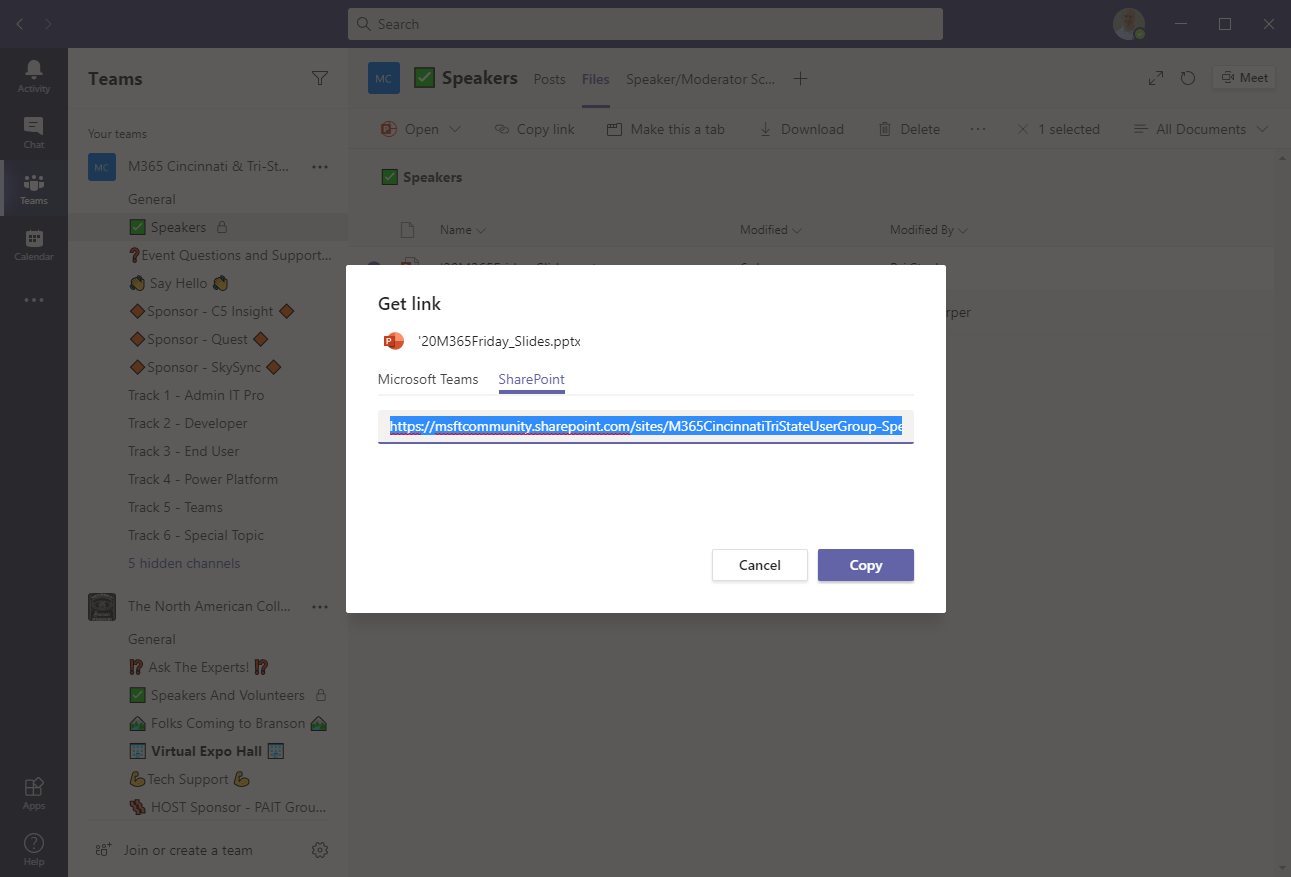


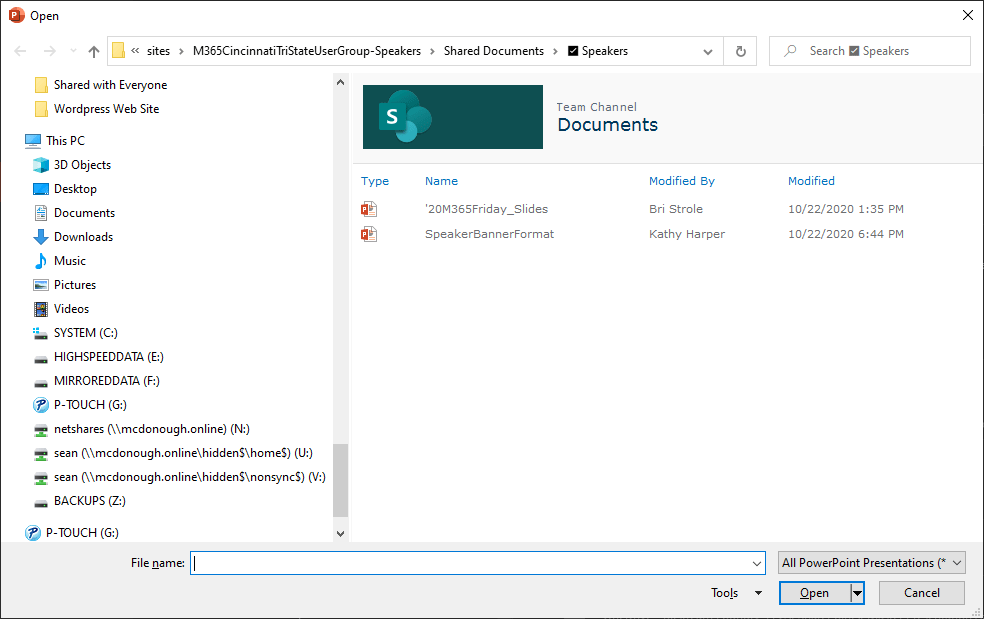


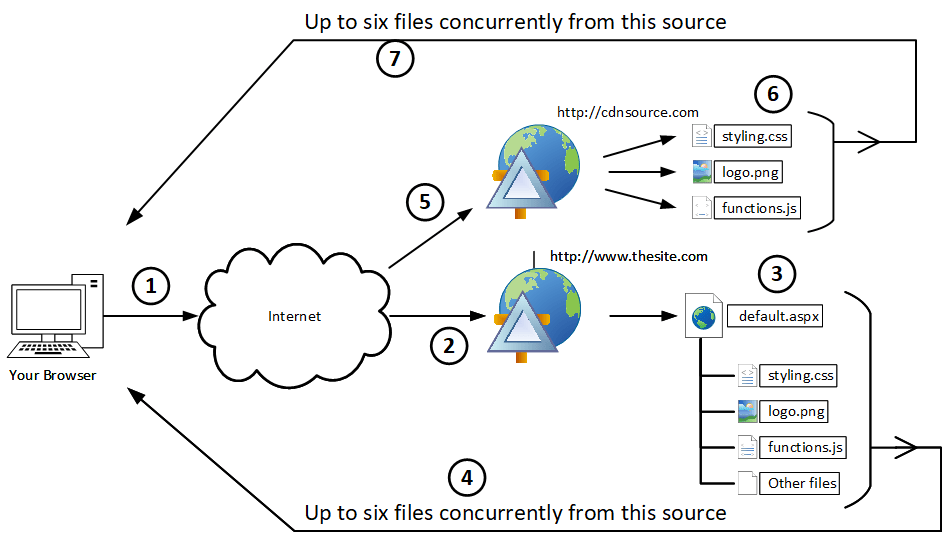

 “Container,” in this case, is really synonymous with “file folder” for the purposes of this discussion. Placement of a file within a folder arbitrarily possessing the color “blue,” for instance, means that the file itself should also possess the color blue by extension, as shown on the left. All the files in the blue folder are therefore blue themselves.
 Although Windows folders can track metadata or properties in a limited sense, accessing and interacting with that metadata can be hit or miss. For instance, my Camera Roll folder on the right has metadata indicating when it was created. It probably has some additional properties over on the Customize tab (I’m guessing) that may be accessible, but they may be read-only. And if I wanted to add my own arbitrary properties to describe this folder, such as the previous “blue” designation of color, I’d be hard-pressed to do so.


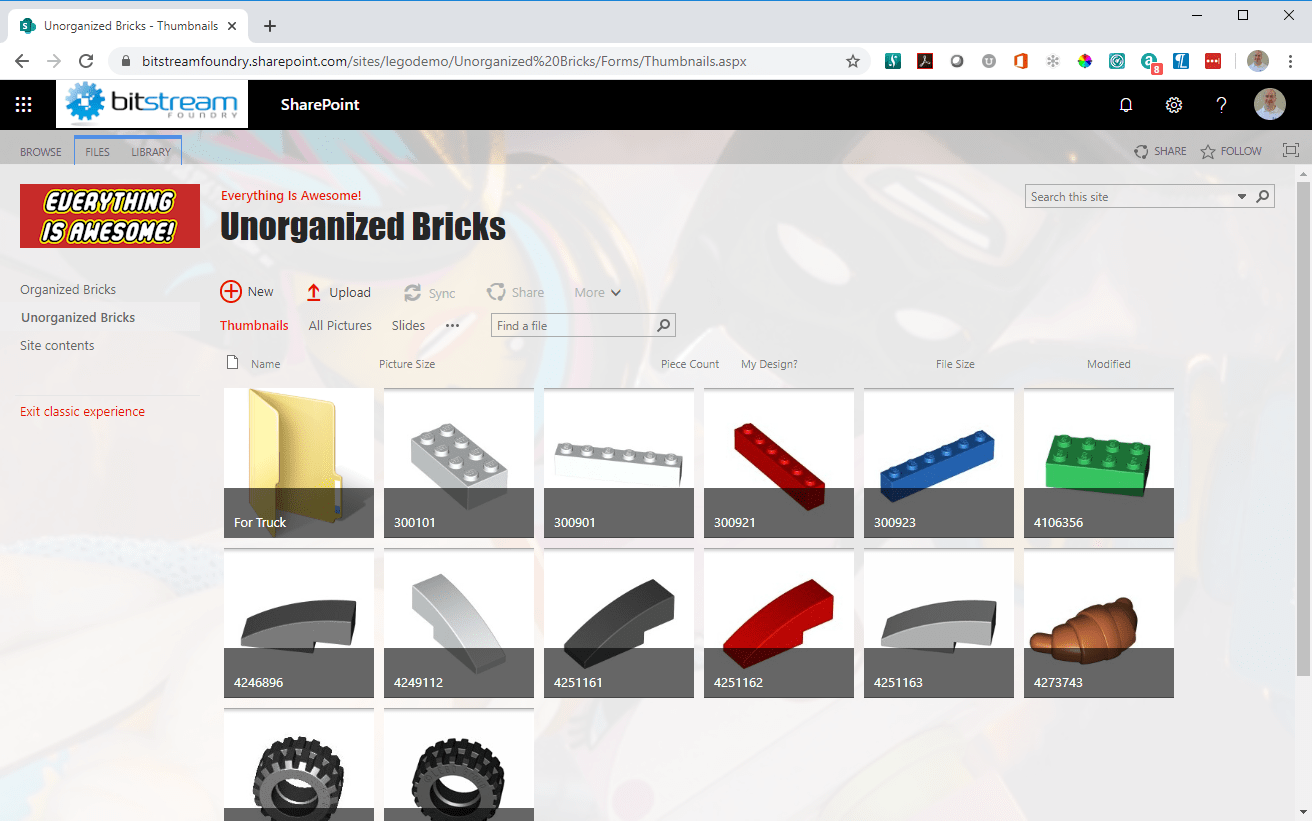


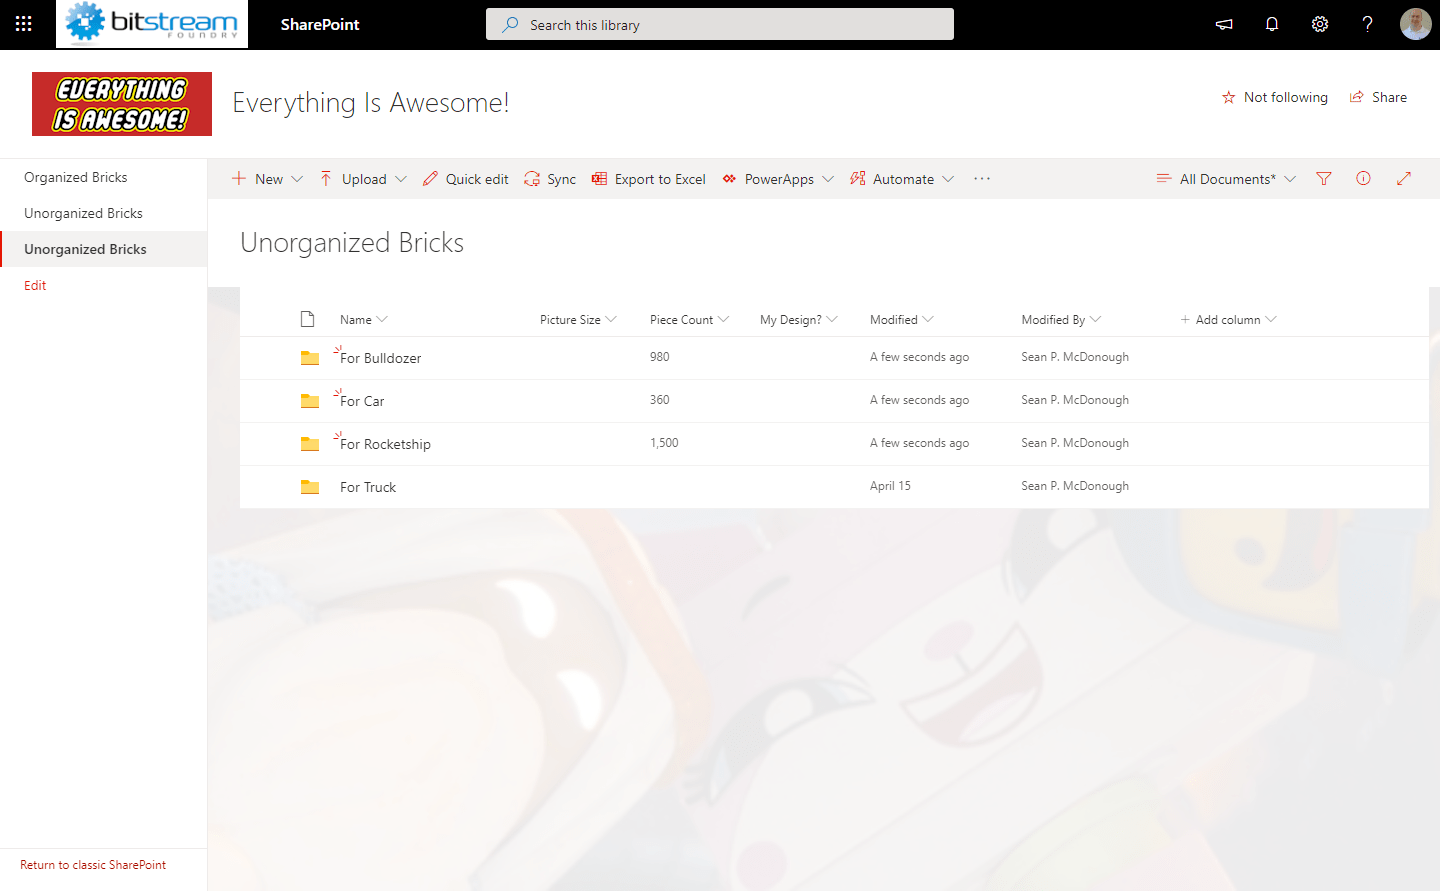
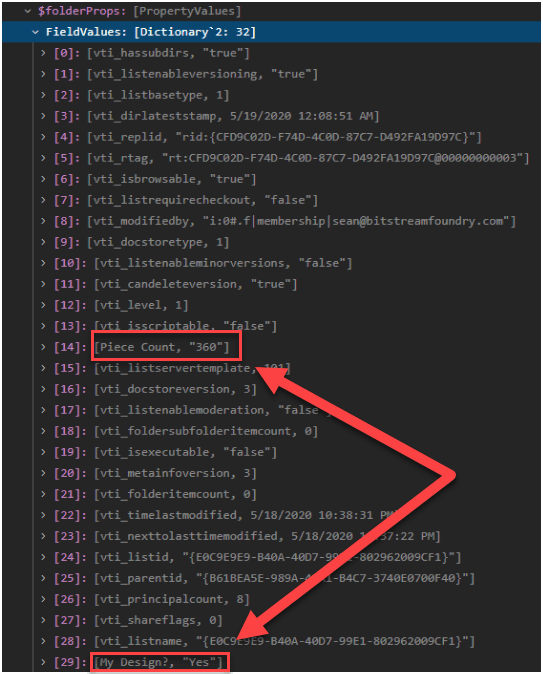


 This brief exchange highlights one of the other points I try hard to make while speaking: PAY ATTENTION TO DATES! It’s not safe to assume (if it ever was) that something you read online will stay accurate and/or relevant indefinitely.


