

UPDATE (6/9/2019): Jonathan Mast, who happens to be a pretty sharp guy and friend of mine, saw this post and enlightened me with another tip (which I've tried and verified). If you want to launch an application as an Administrator, you can also press <CTRL><SHIFT> while left-clicking the shortcut. Microsoft officially lists this shortcut among its list of Taskbar keyboard shortcuts here. It just so happens that Jonathan now works for Microsoft!
This post is nothing earth-shattering, and my only hope is that it exposes a person or two to a less-than-obvious technique that might yield some incremental time savings when building shortcuts.
I was building some virtual machines the other day, and I was dropping shortcuts onto the Windows Start Menu and the Windows Taskbar with abandon. Creating shortcuts is relatively easy, but I wanted the applications associated with the shortcuts to run with Administrator privileges.
To launch an application from an associated shortcut, we typically do one of the following:
- Single left-click an application shortcut icon (for applications on the Start Menu or Taskbar)
- Double left-click an application shortcut icon (in the case of a desktop application shortcuts)
We’ve been doing this for decades now to execute an application. But when we want to launch an application within the security context of an account with Administrator rights, we’ve got to do that right-click thing to select “Run as Administrator” from the list of menu options we’re presented with. It’s a trivial step, I know, but it’s annoying as all get out. My index finger wants to do the clicking, dammit …
Well, there’s a better way to handle this situation. Wouldn’t you like to set up your Start Menu and Taskbar shortcuts to automatically “Run as Administrator” whenever you launch them in the standard left-click (or left double-click) fashion?
The Task at Hand

This is actually relatively easy to do, but I’m sure that there are at least a few out there for whom this will be new knowledge.
For Taskbar-pinned application shortcuts that you always want to launch with Administrator privileges, perform the initial right-click that you normally would to select “Run as Administrator” as demonstrated in the image above and to the right for the Windows PowerShell icon I have pinned to my Taskbar. Instead of clicking “Run as Administrator” as is normally the case, right-click again on the name of the application you want to set up to run in the context of the Administrator account.
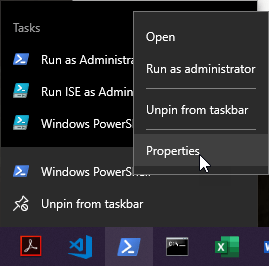
In the case of my example, that’s Windows PowerShell. So, I’d right-click once to open the context-sensitive menu seen above, and then I’d right click the “Windows PowerShell” option to open the second context-sensitive menu seen on the left.
Upon selecting “Properties” with a left-click from the second context sensitive window shown above and to the left, the Properties dialog box would appear for the application (as shown below).

Upon seeing this dialog box, you should left-click the “Advanced …” button that appears approximately 2/3 of the way down the dialog on the right. When you click that the “Advanced …” button, you’ll see an “Advanced Properties” dialog open as seen below.

At this point, simply click on the “Run as administrator” checkbox and click the “OK” button on all of the open dialogs to apply your changes. From this point forward, whenever you left-click on the Taskbar shortcut you’ve just configured, the associated application will launch in the context of the Administrator account!
What About Start Menu Items?
Setting up Start Menu shortcuts to “Run as Administrator” is really just a variation on the theme we’ve already established. As with the Taskbar shortcuts, we begin by right-clicking the desired shortcut. In this example, I’m going to use “.Net Reflector 9.0” shortcut:

After the first right-click, I then hover over or expand the “More” menu item and select the “Open file location” option:

This will open Windows Explorer to the location in the local file system of the shortcut we’re interested in configuring.

From this point onward, it’s the same as it was with the Taskbar shortcuts. Simply click the “Advanced…” button and check the “Run as Adminstrator” box for the shortcut to have the associated application launch in the Administrator context.
Wrap-up
This post wasn’t rocket science, but when I was reminded of the shortcut configuration process (by the recent creation of a new batch of SharePoint 2019 VMs and all of their shortcuts), I figured sharing it out might help a person or two. And after all, that’s what it’s all about! Besides, it gave me the chance to write something up, so I consider it an all-around win. I hope that you feel the same way